Release Notes
Installation
Install on Linux
Install on Kubernetes
Pluggable Components
Upgrade
Third-Party Tools
Authentication Integration
Cluster Operations
Quick Start
DevOps
User Guide
Configration Center
Logging
Developer Guide
API Documentation
Troubleshooting
FAQ
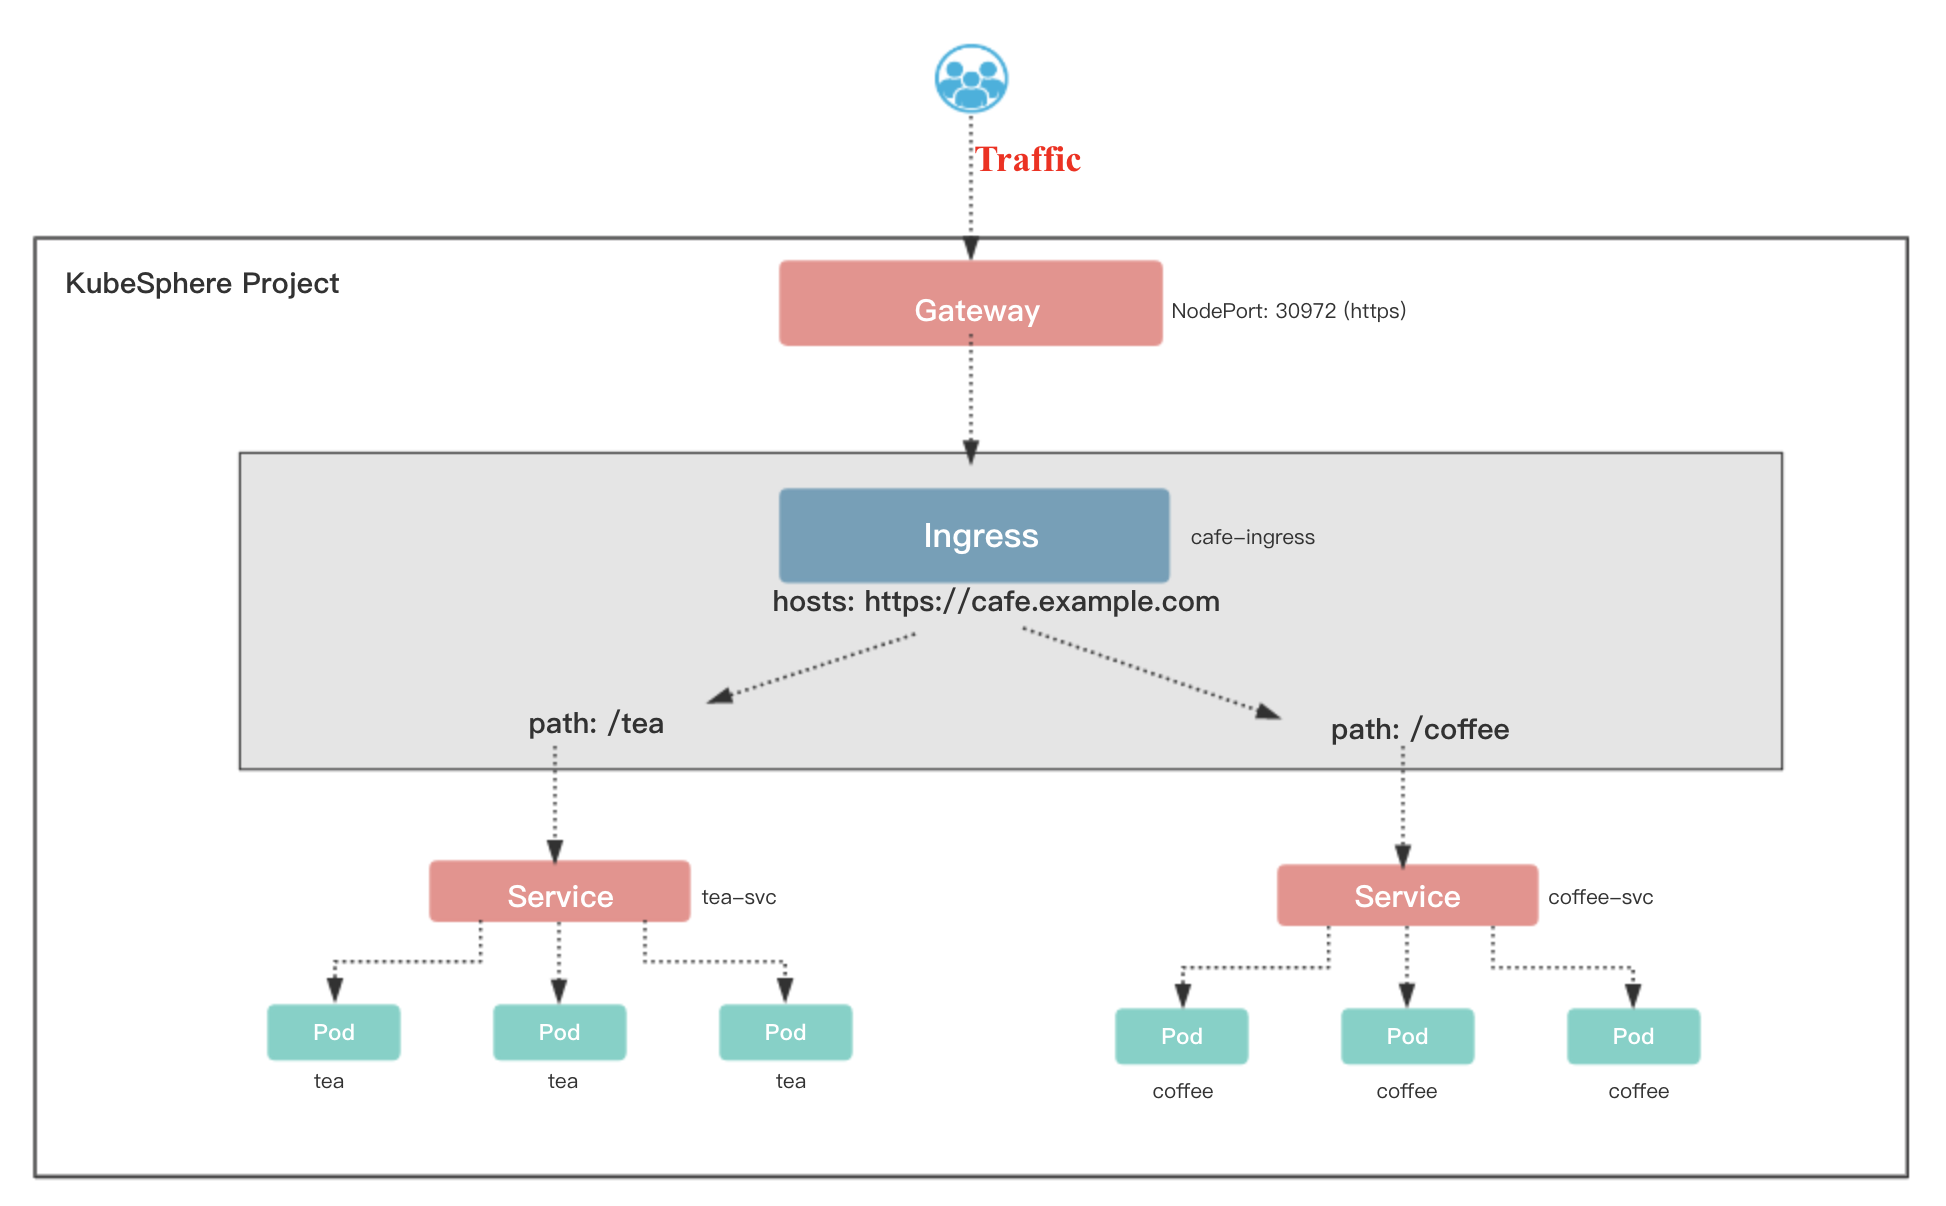
Expose your App: Creating a Service and Ingress
EditIn each project, namely, Kubernetes namespace, KubeSphere has pre-installed a load balancer which is Nginx Ingress Controller. You need to activate it before using it. As we know, ingress and ingress controller are used to expose services outside. The website Kubernetes-ingress provides an example showing how to use ingress. Let's take a demo website https://cafe.example.com as an example. If users access the URL https://cafe.example.com/coffee, it will return "Coffee Ordering System". Similarly, when access the URL https://cafe.example.com/tea, it will return "Tea Ordering System".
To elaborate this demo, we will create two stateless applications which include Deployments, Services and Ingress in this tutorial.
Prerequisites
You have completed all steps in Getting Started with Multi-tenant Management including enabling gateway.
Estimated Time
About 20 minutes
Hands-on Lab
Step 1: Create a Tea Service
In this section, we will create a "Tea Ordering System" service as the following.
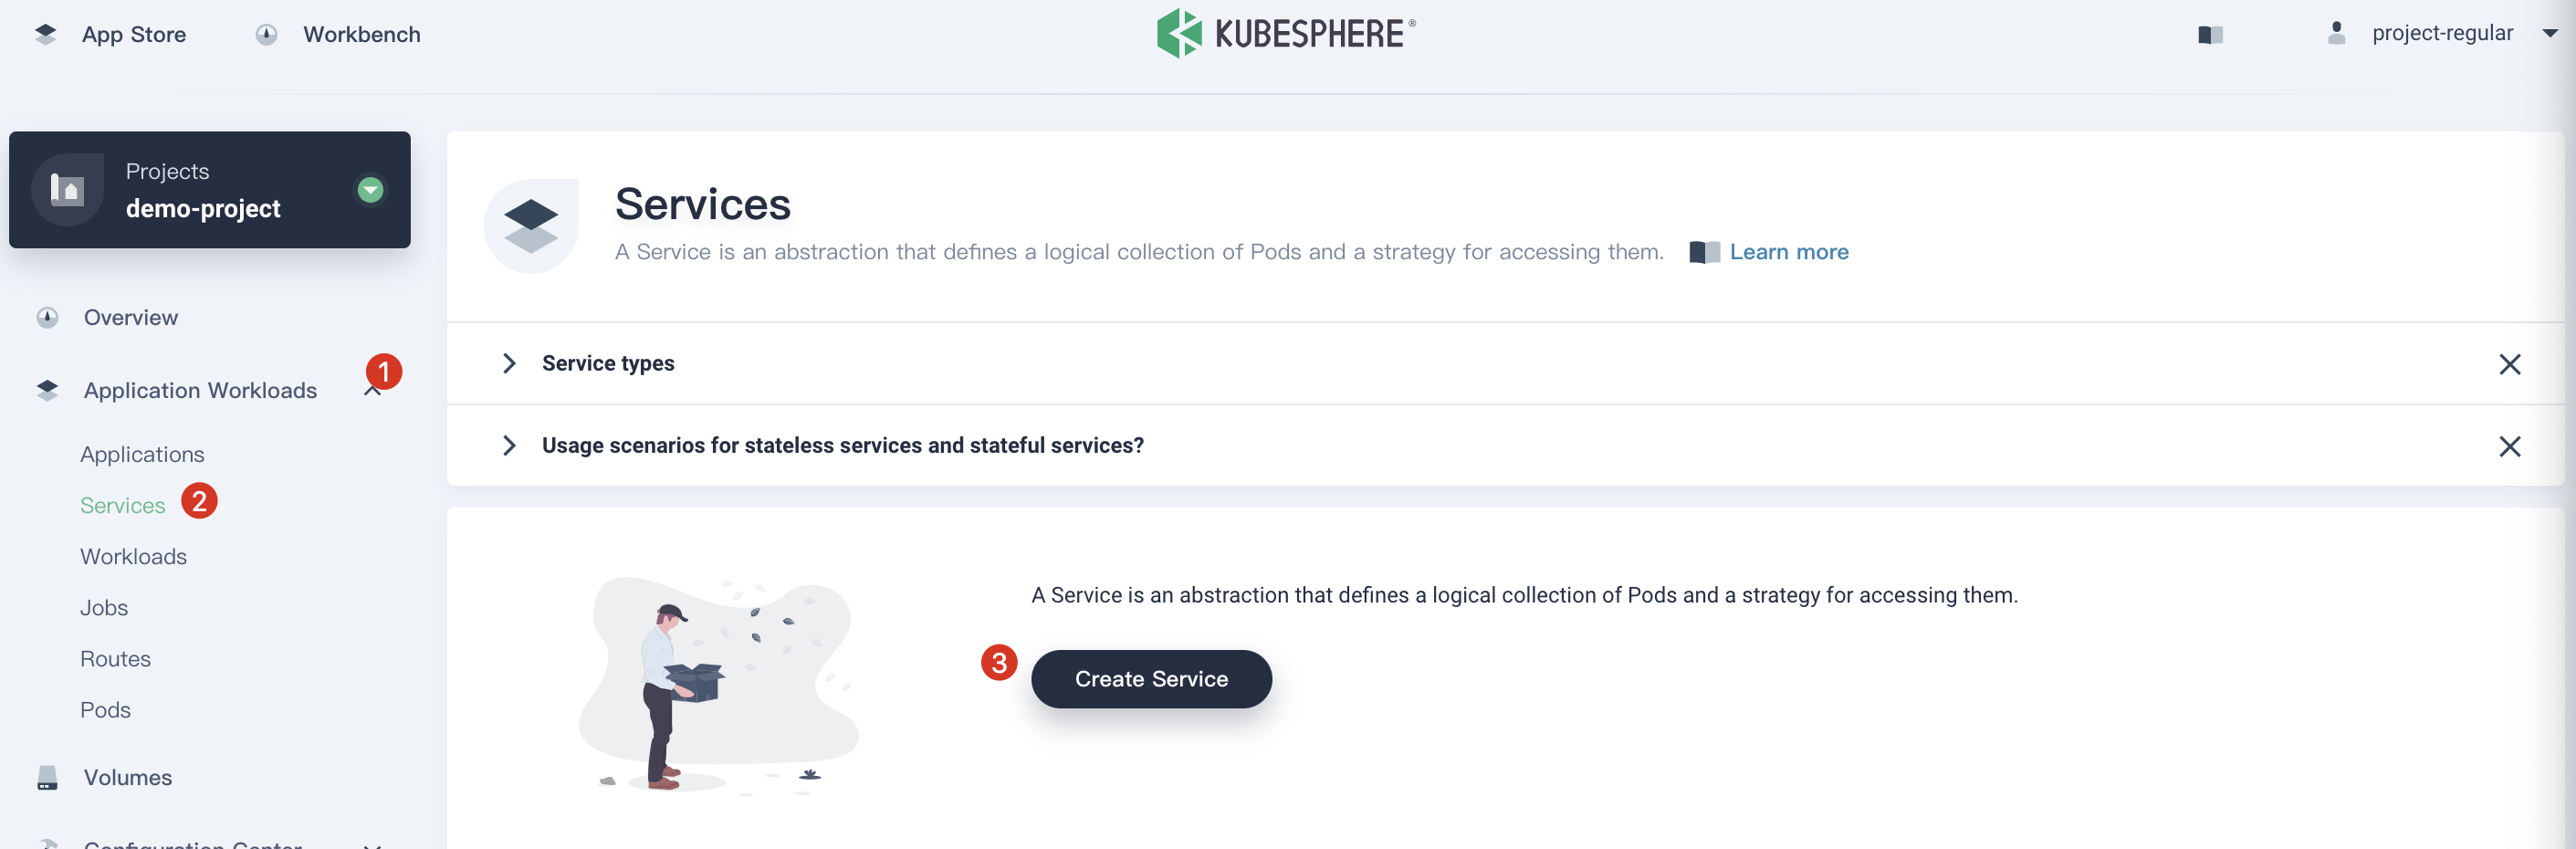
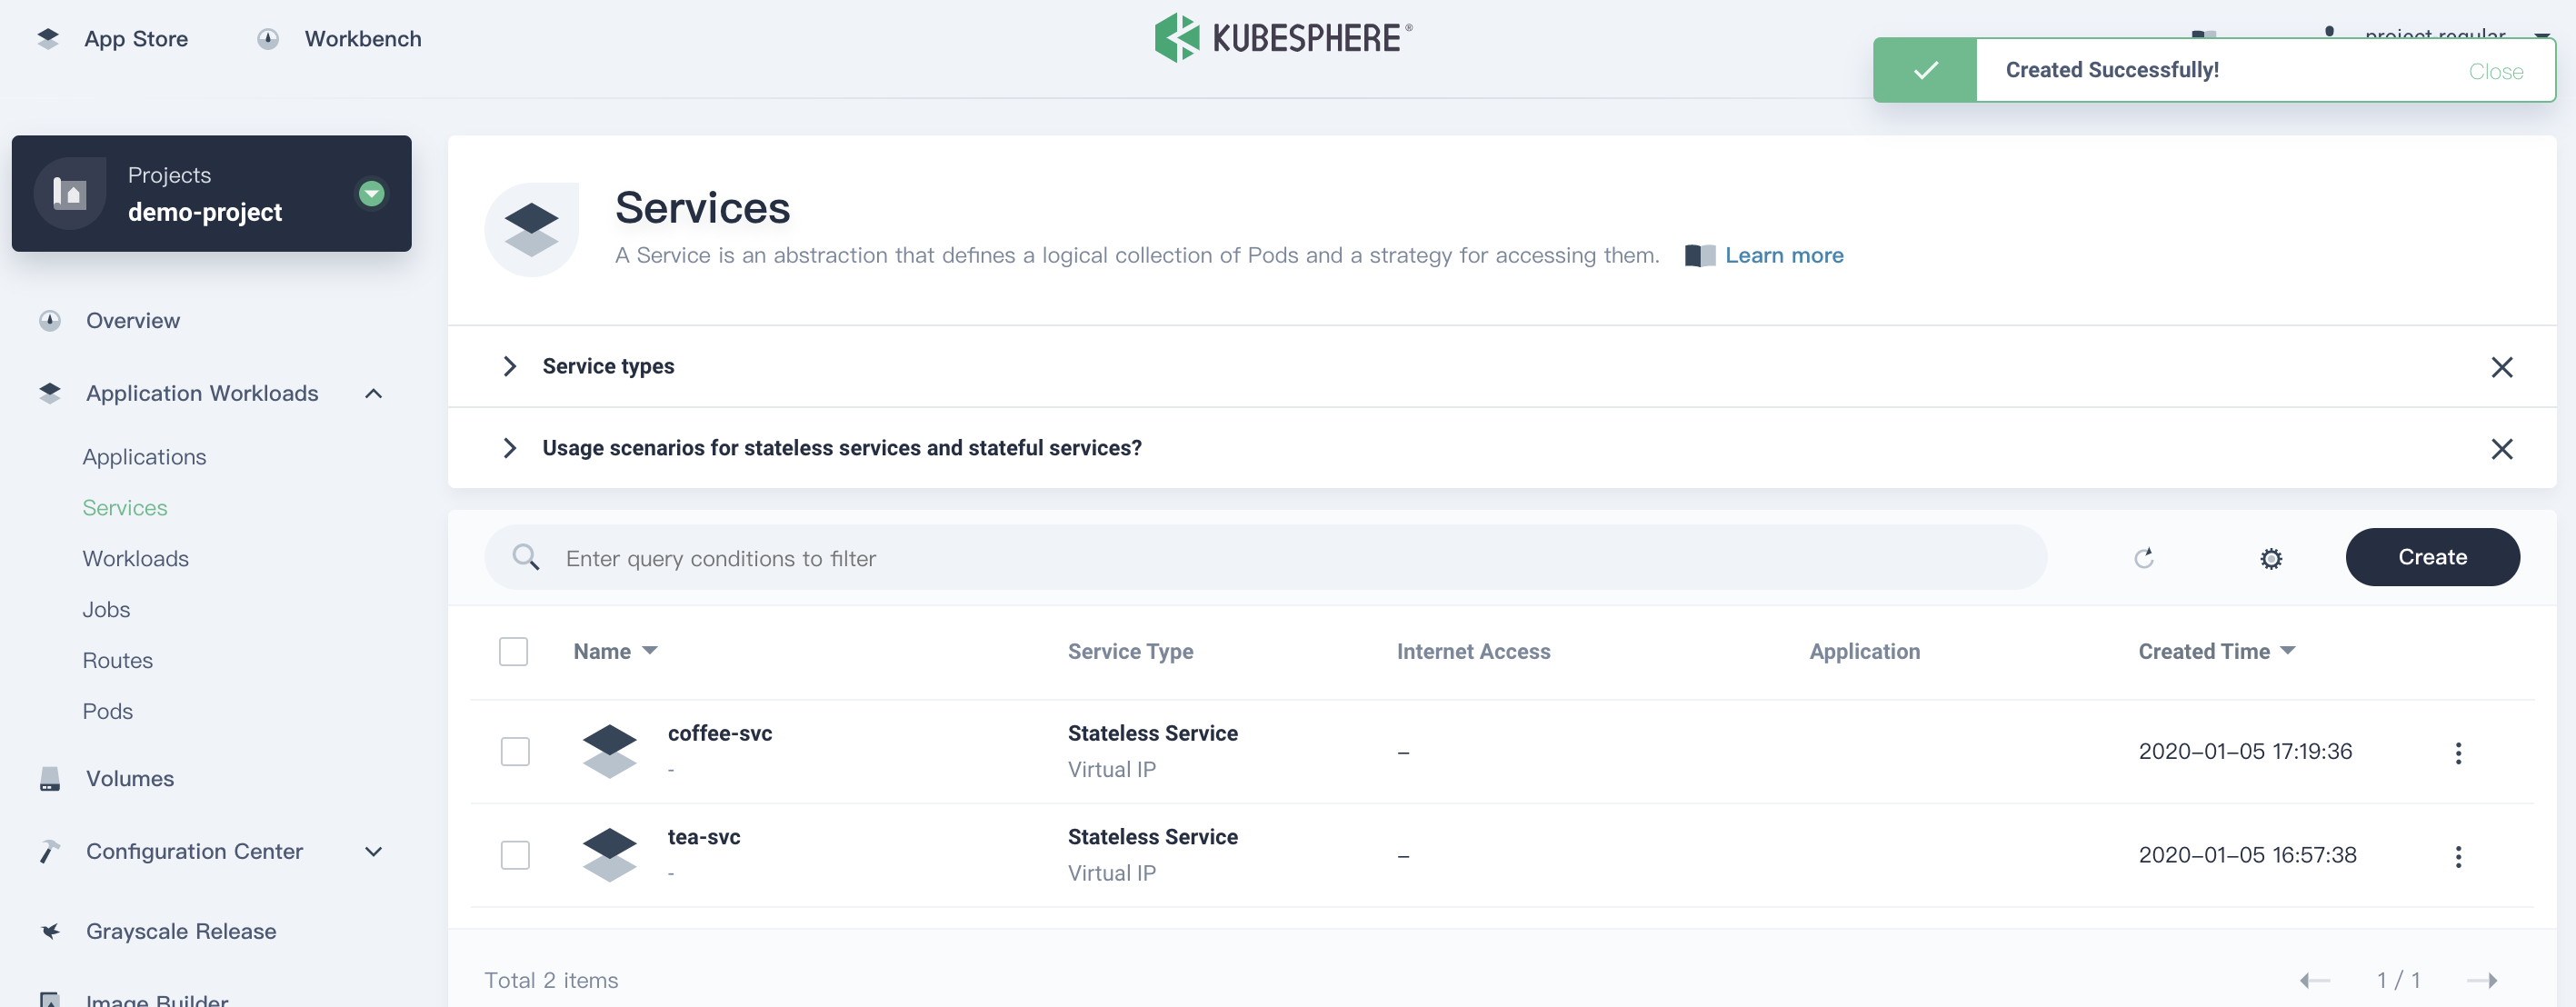
1.1. Sign in with project-regular, then enter demo-project. Choose Application Workloads → Services and click Create Service.
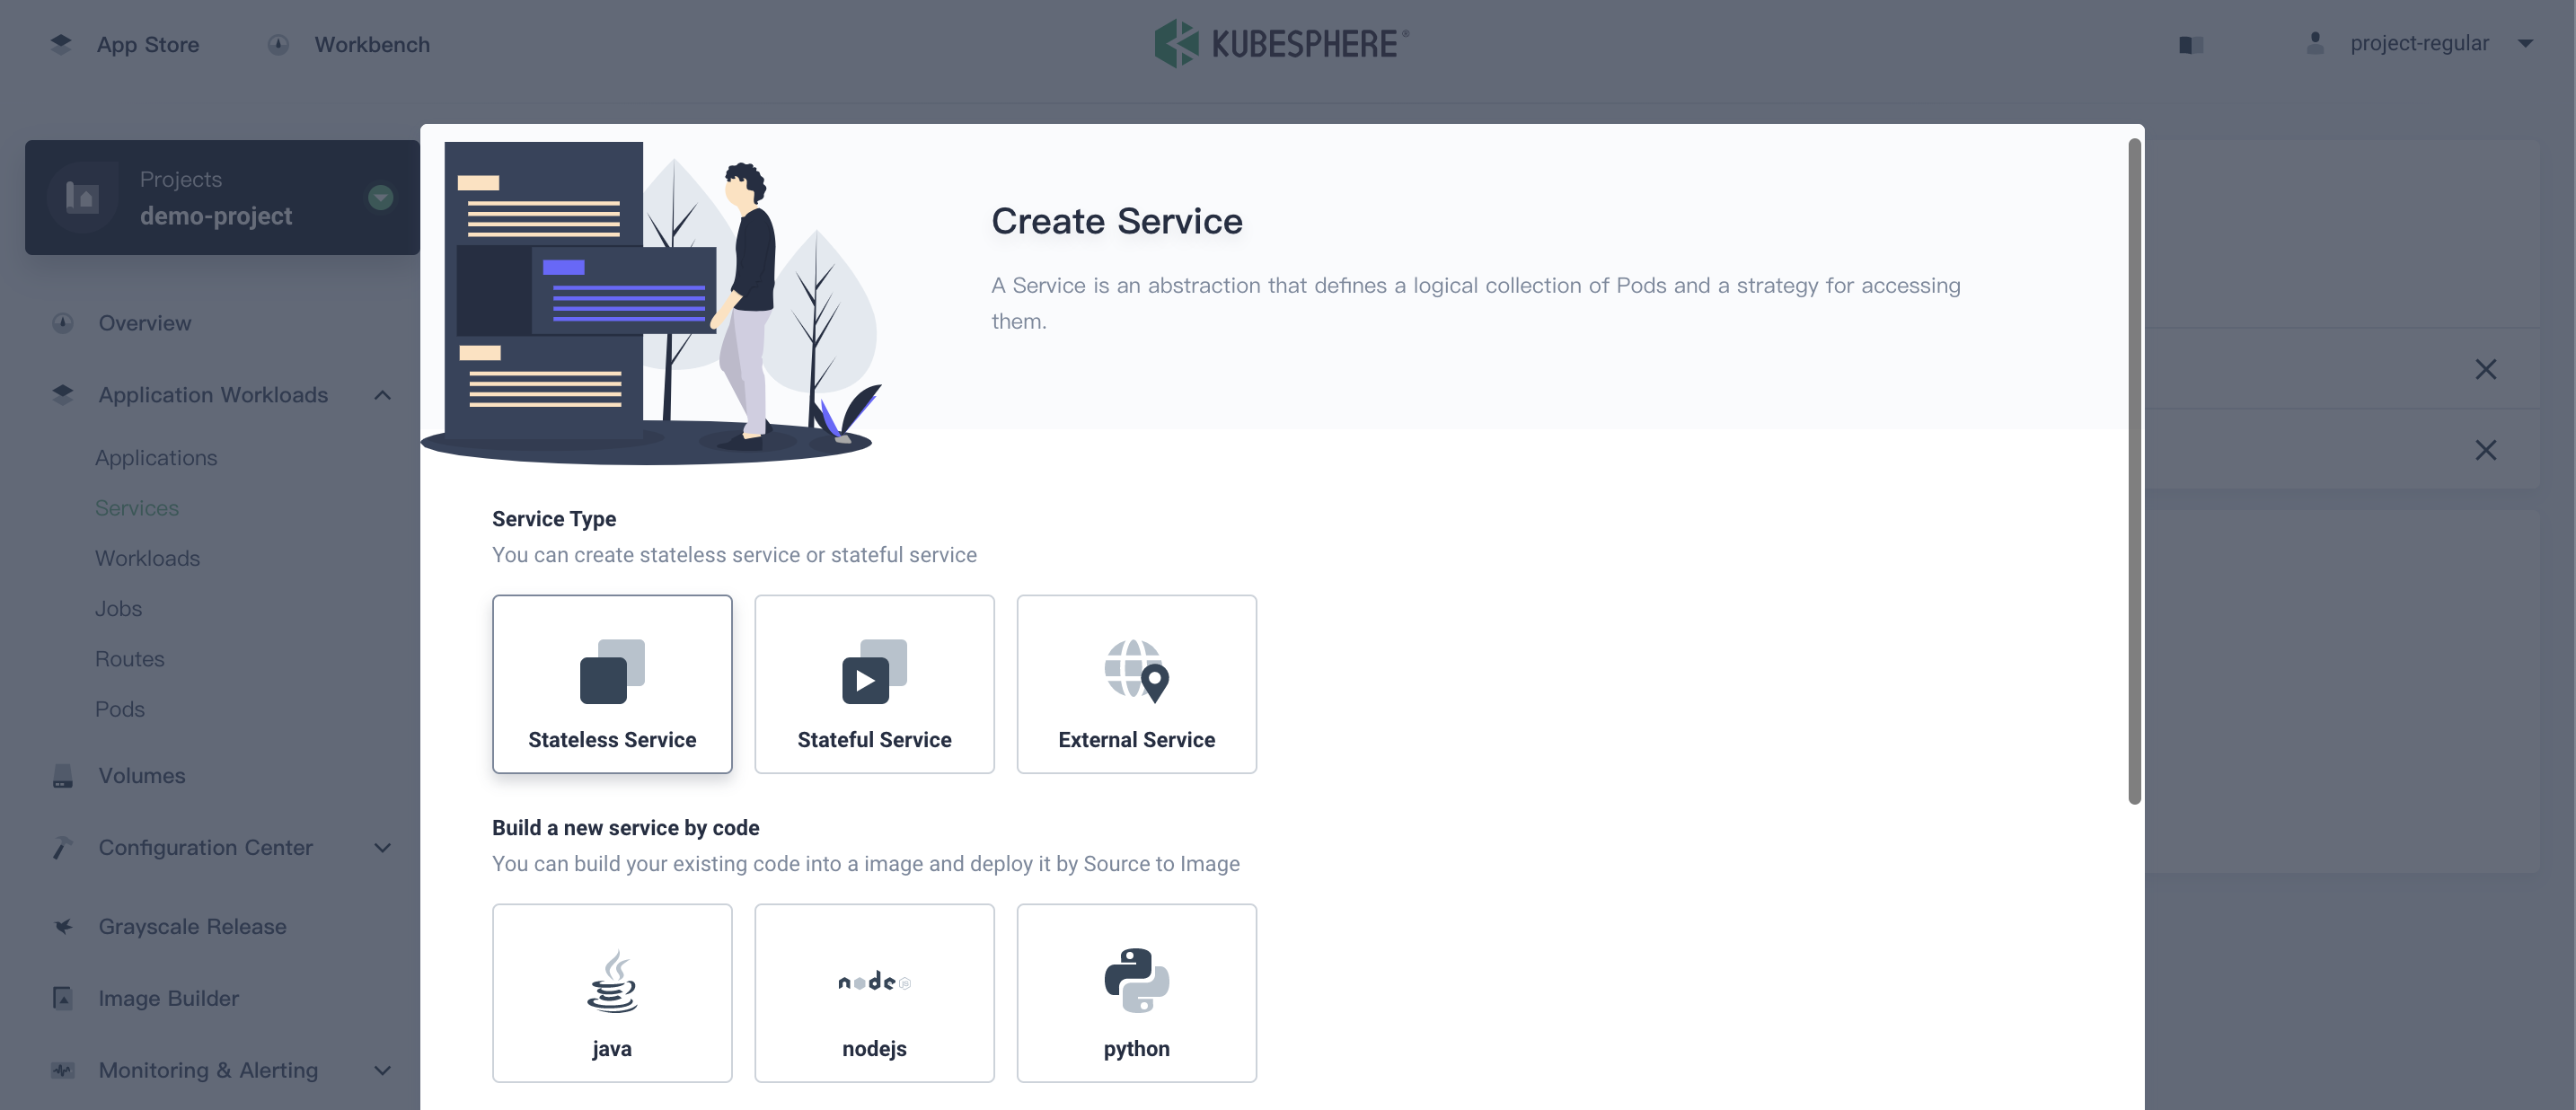
1.2. Choose the type Stateless Service in Service Type, and name it tea-svc, click Next.
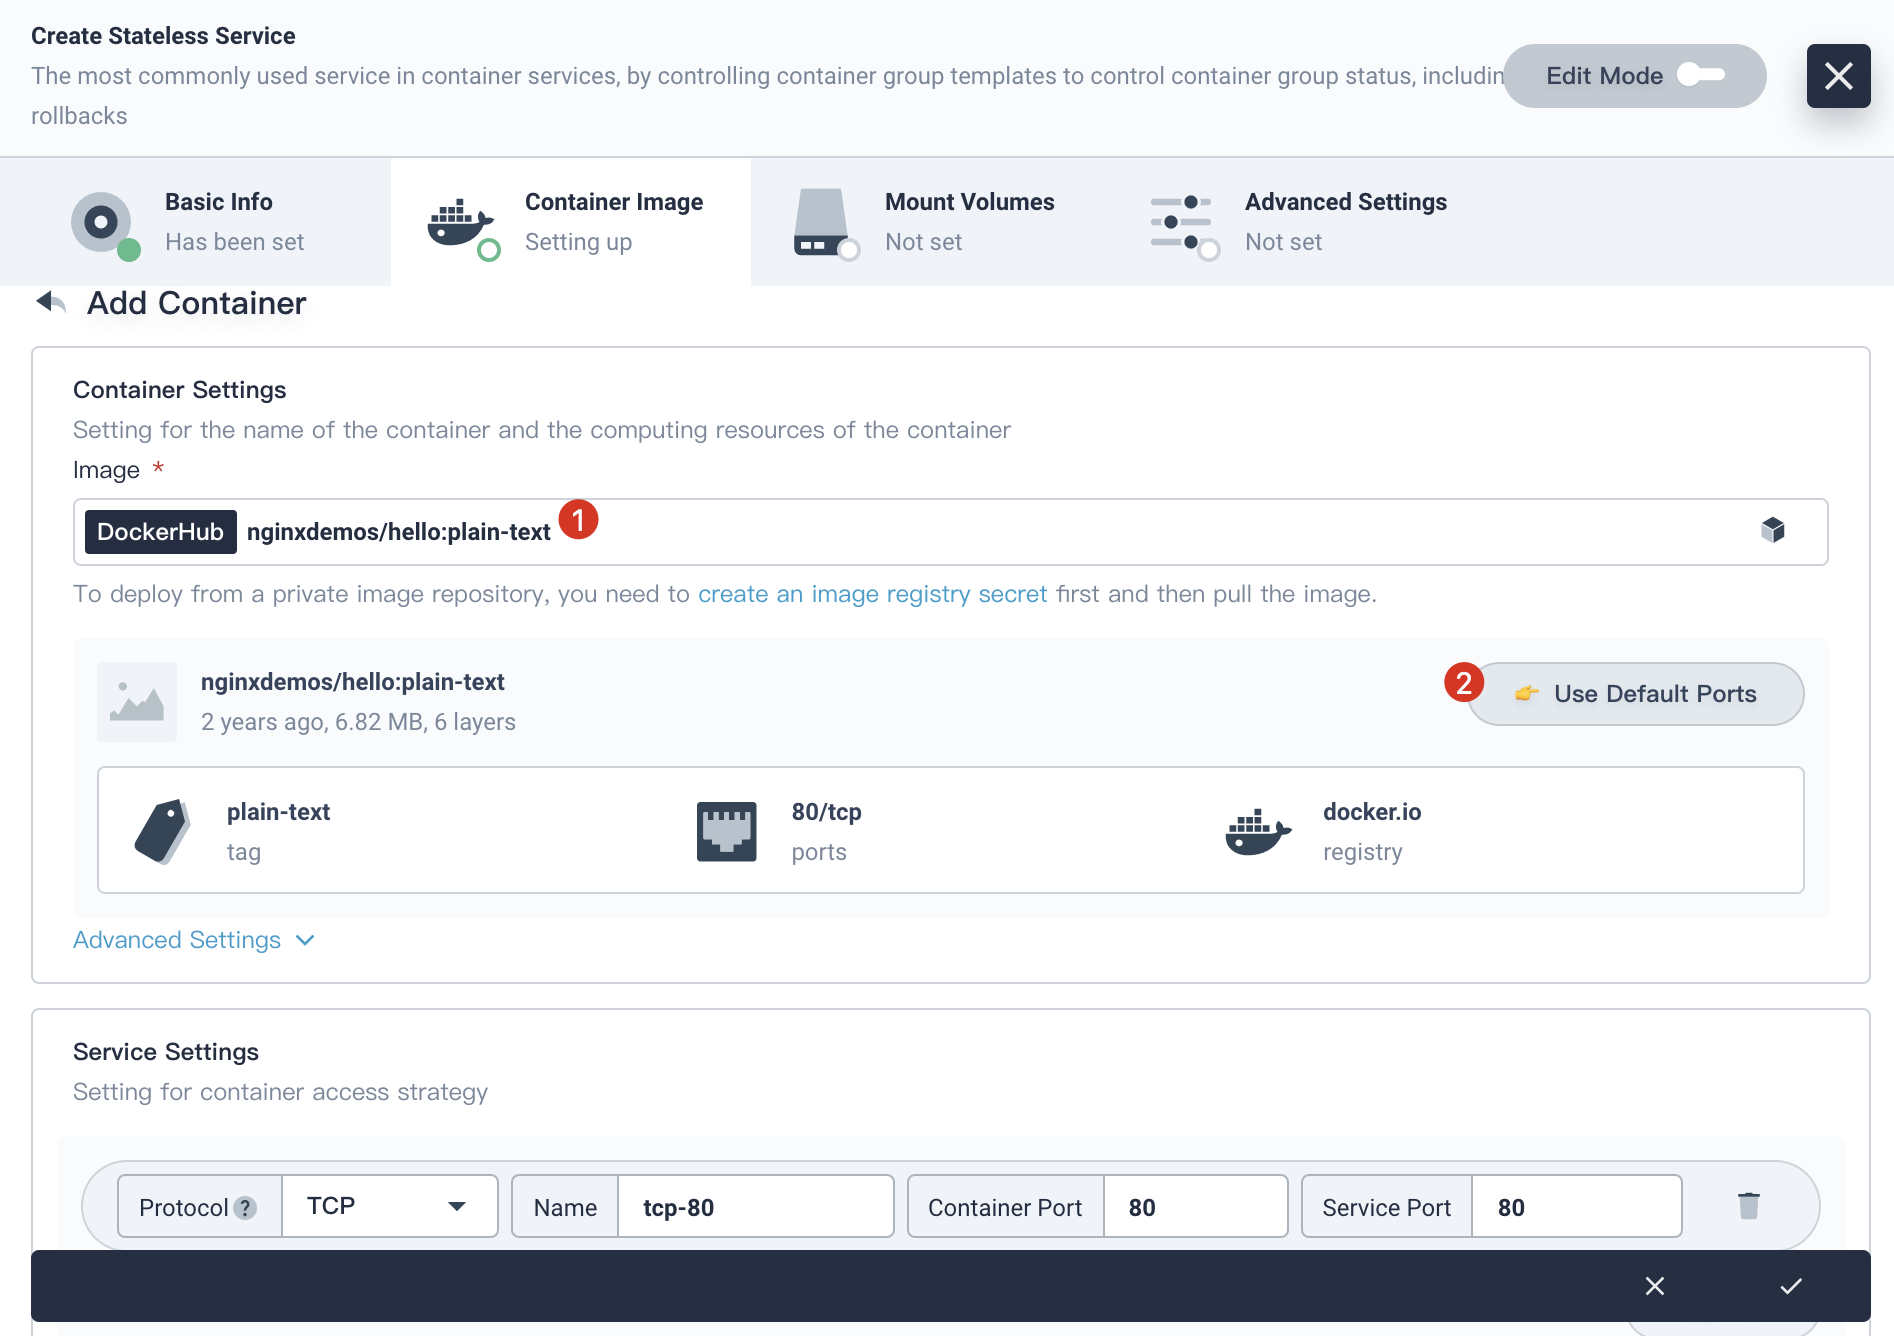
1.3. Click Add Container Image. Then fill in the Image with nginxdemos/hello:plain-text, press Enter button, click Use Default Ports and choose √, then click Next.
1.4. It is not required to mount volumes or configure advanced settings in this step. Just click Next to skip it, then click Create to complete tea-svc creation.

Step 2: Create a Coffee Service
2.1. Similarly, click Create button to create a "Coffee Ordering System" service.
2.2. Name it coffee-svc and click Next, click Add Container Image. Then fill in the Image with nginxdemos/hello:plain-text and press Enter button, click Use Default Ports and choose √. Other steps are the same as the creation of the service tea-svc.
Step 3: Create a TLS Certificate
Since the domain name bound in the route, namely, Ingress, is the HTTPS protocol, we need to create a secret to store the TLS certificate.
3.1. Choose Configuration Center → Secrets, then click Create.
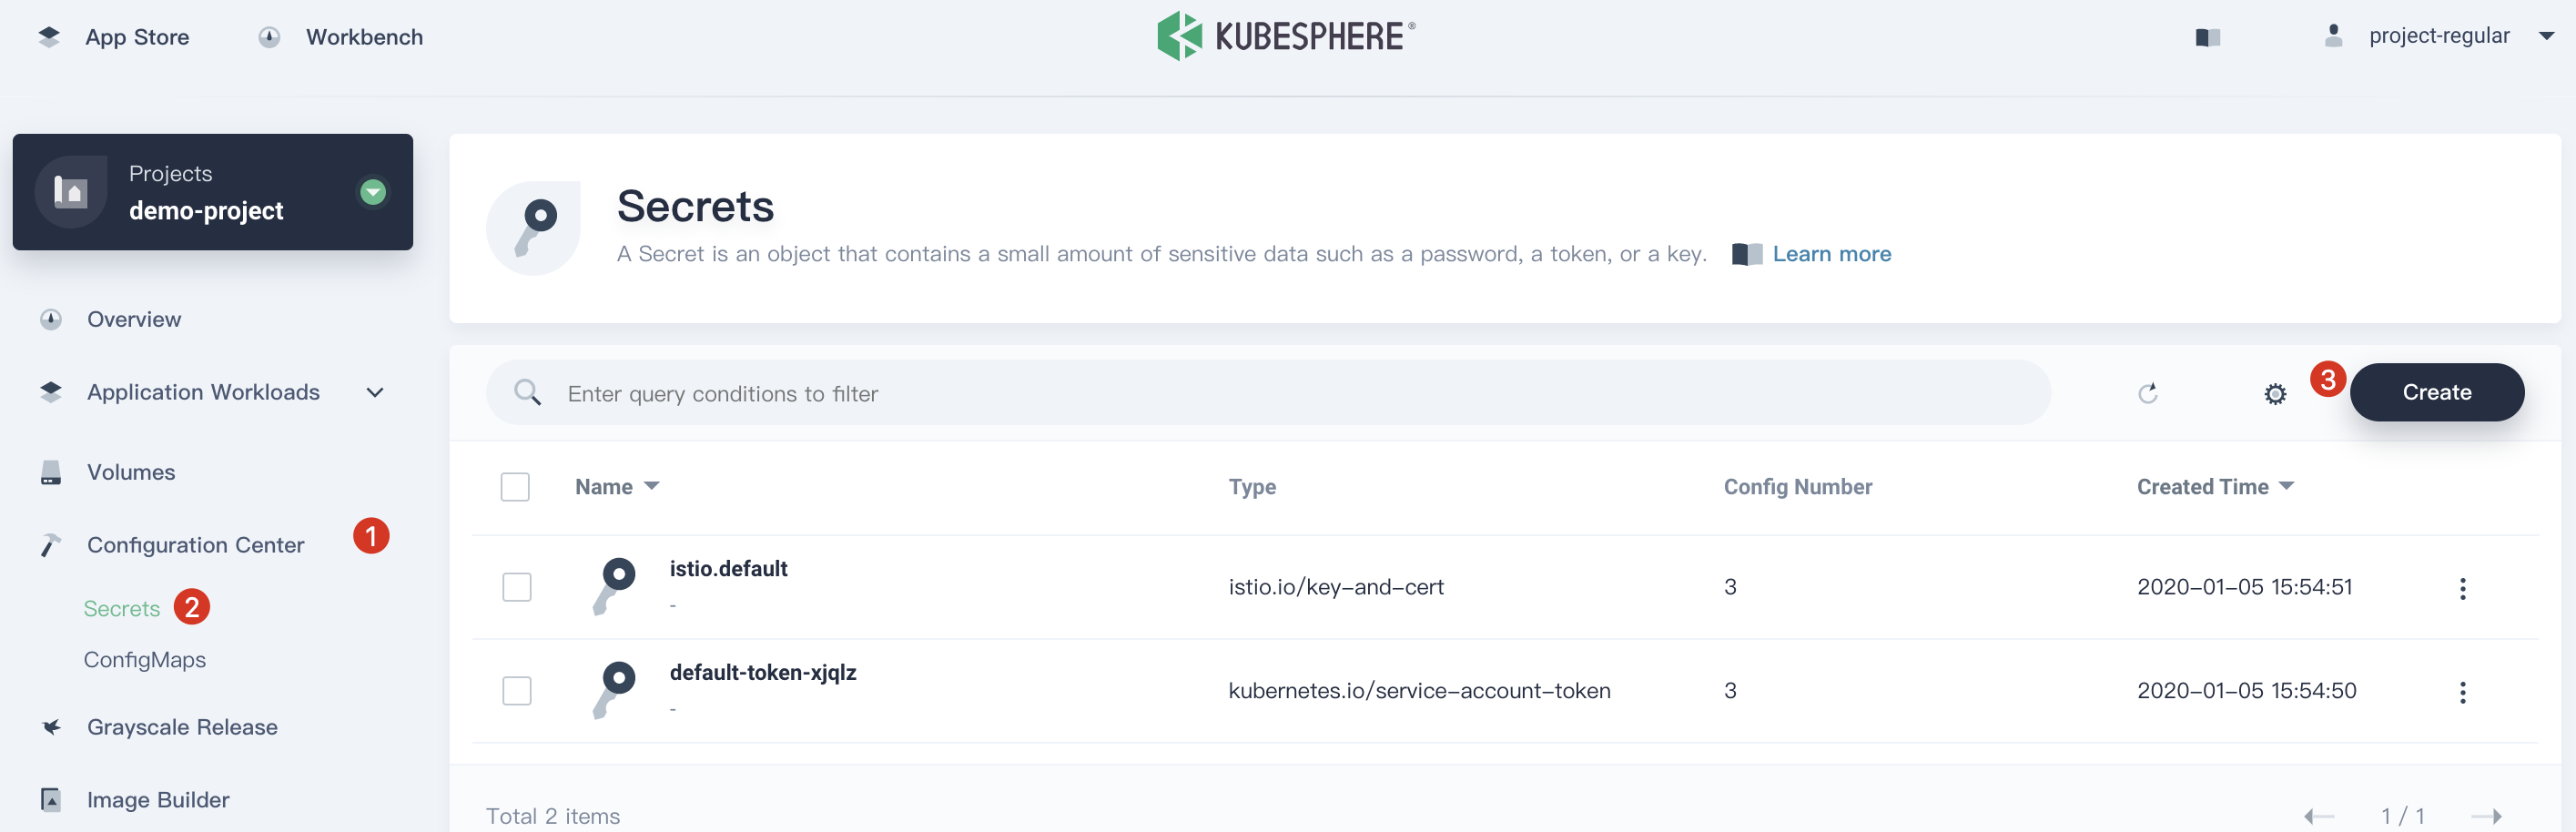
3.2. Name it cafe-secret, click Next. Select the TLS from the Type dropdown menu, then copy and paste Credential and Private Key as follows, click Create when you have done.
Credential
-----BEGIN CERTIFICATE-----
MIIDLjCCAhYCCQDAOF9tLsaXWjANBgkqhkiG9w0BAQsFADBaMQswCQYDVQQGEwJV
UzELMAkGA1UECAwCQ0ExITAfBgNVBAoMGEludGVybmV0IFdpZGdpdHMgUHR5IEx0
ZDEbMBkGA1UEAwwSY2FmZS5leGFtcGxlLmNvbSAgMB4XDTE4MDkxMjE2MTUzNVoX
DTIzMDkxMTE2MTUzNVowWDELMAkGA1UEBhMCVVMxCzAJBgNVBAgMAkNBMSEwHwYD
VQQKDBhJbnRlcm5ldCBXaWRnaXRzIFB0eSBMdGQxGTAXBgNVBAMMEGNhZmUuZXhh
bXBsZS5jb20wggEiMA0GCSqGSIb3DQEBAQUAA4IBDwAwggEKAoIBAQCp6Kn7sy81
p0juJ/cyk+vCAmlsfjtFM2muZNK0KtecqG2fjWQb55xQ1YFA2XOSwHAYvSdwI2jZ
ruW8qXXCL2rb4CZCFxwpVECrcxdjm3teViRXVsYImmJHPPSyQgpiobs9x7DlLc6I
BA0ZjUOyl0PqG9SJexMV73WIIa5rDVSF2r4kSkbAj4Dcj7LXeFlVXH2I5XwXCptC
n67JCg42f+k8wgzcRVp8XZkZWZVjwq9RUKDXmFB2YyN1XEWdZ0ewRuKYUJlsm692
skOrKQj0vkoPn41EE/+TaVEpqLTRoUY3rzg7DkdzfdBizFO2dsPNFx2CW0jXkNLv
Ko25CZrOhXAHAgMBAAEwDQYJKoZIhvcNAQELBQADggEBAKHFCcyOjZvoHswUBMdL
RdHIb383pWFynZq/LuUovsVA58B0Cg7BEfy5vWVVrq5RIkv4lZ81N29x21d1JH6r
jSnQx+DXCO/TJEV5lSCUpIGzEUYaUPgRyjsM/NUdCJ8uHVhZJ+S6FA+CnOD9rn2i
ZBePCI5rHwEXwnnl8ywij3vvQ5zHIuyBglWr/Qyui9fjPpwWUvUm4nv5SMG9zCV7
PpuwvuatqjO1208BjfE/cZHIg8Hw9mvW9x9C+IQMIMDE7b/g6OcK7LGTLwlFxvA8
7WjEequnayIphMhKRXVf1N349eN98Ez38fOTHTPbdJjFA/PcC+Gyme+iGt5OQdFh
yRE=
-----END CERTIFICATE-----
Private Key
-----BEGIN RSA PRIVATE KEY-----
MIIEowIBAAKCAQEAqeip+7MvNadI7if3MpPrwgJpbH47RTNprmTStCrXnKhtn41k
G+ecUNWBQNlzksBwGL0ncCNo2a7lvKl1wi9q2+AmQhccKVRAq3MXY5t7XlYkV1bG
CJpiRzz0skIKYqG7Pcew5S3OiAQNGY1DspdD6hvUiXsTFe91iCGuaw1Uhdq+JEpG
wI+A3I+y13hZVVx9iOV8FwqbQp+uyQoONn/pPMIM3EVafF2ZGVmVY8KvUVCg15hQ
dmMjdVxFnWdHsEbimFCZbJuvdrJDqykI9L5KD5+NRBP/k2lRKai00aFGN684Ow5H
c33QYsxTtnbDzRcdgltI15DS7yqNuQmazoVwBwIDAQABAoIBAQCPSdSYnQtSPyql
FfVFpTOsoOYRhf8sI+ibFxIOuRauWehhJxdm5RORpAzmCLyL5VhjtJme223gLrw2
N99EjUKb/VOmZuDsBc6oCF6QNR58dz8cnORTewcotsJR1pn1hhlnR5HqJJBJask1
ZEnUQfcXZrL94lo9JH3E+Uqjo1FFs8xxE8woPBqjZsV7pRUZgC3LhxnwLSExyFo4
cxb9SOG5OmAJozStFoQ2GJOes8rJ5qfdvytgg9xbLaQL/x0kpQ62BoFMBDdqOePW
KfP5zZ6/07/vpj48yA1Q32PzobubsBLd3Kcn32jfm1E7prtWl+JeOFiOznBQFJbN
4qPVRz5hAoGBANtWyxhNCSLu4P+XgKyckljJ6F5668fNj5CzgFRqJ09zn0TlsNro
FTLZcxDqnR3HPYM42JERh2J/qDFZynRQo3cg3oeivUdBVGY8+FI1W0qdub/L9+yu
edOZTQ5XmGGp6r6jexymcJim/OsB3ZnYOpOrlD7SPmBvzNLk4MF6gxbXAoGBAMZO
0p6HbBmcP0tjFXfcKE77ImLm0sAG4uHoUx0ePj/2qrnTnOBBNE4MvgDuTJzy+caU
k8RqmdHCbHzTe6fzYq/9it8sZ77KVN1qkbIcuc+RTxA9nNh1TjsRne74Z0j1FCLk
hHcqH0ri7PYSKHTE8FvFCxZYdbuB84CmZihvxbpRAoGAIbjqaMYPTYuklCda5S79
YSFJ1JzZe1Kja//tDw1zFcgVCKa31jAwciz0f/lSRq3HS1GGGmezhPVTiqLfeZqc
R0iKbhgbOcVVkJJ3K0yAyKwPTumxKHZ6zImZS0c0am+RY9YGq5T7YrzpzcfvpiOU
ffe3RyFT7cfCmfoOhDCtzukCgYB30oLC1RLFOrqn43vCS51zc5zoY44uBzspwwYN
TwvP/ExWMf3VJrDjBCH+T/6sysePbJEImlzM+IwytFpANfiIXEt/48Xf60Nx8gWM
uHyxZZx/NKtDw0V8vX1POnq2A5eiKa+8jRARYKJLYNdfDuwolxvG6bZhkPi/4EtT
3Y18sQKBgHtKbk+7lNJVeswXE5cUG6EDUsDe/2Ua7fXp7FcjqBEoap1LSw+6TXp0
ZgrmKE8ARzM47+EJHUviiq/nupE15g0kJW3syhpU9zZLO7ltB0KIkO9ZRcmUjo8Q
cpLlHMAqbLJ8WYGJCkhiWxyal6hYTyWY4cVkC0xtTl/hUE9IeNKo
-----END RSA PRIVATE KEY-----
Step 4: Create a Cafe Ingress
Now we are ready to expose the two services with Ingress.
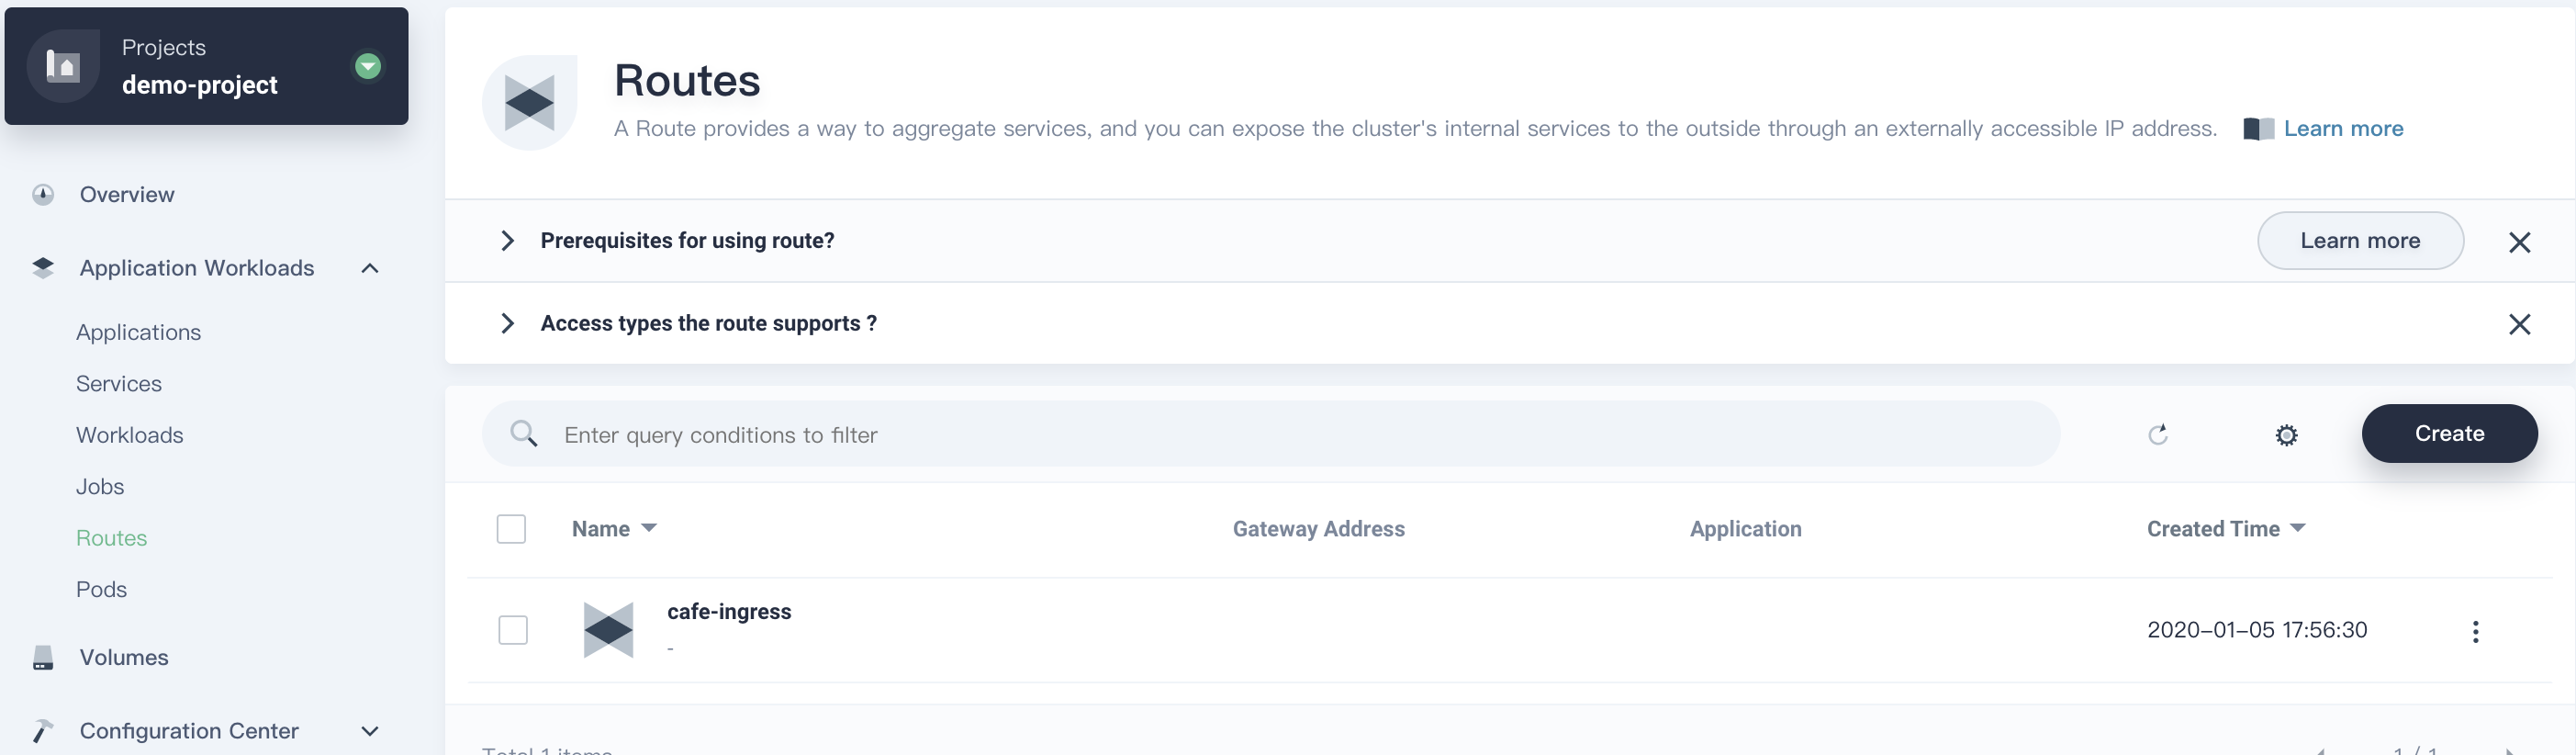
4.1. Choose Application Workloads → Routes, and click Create Route button.
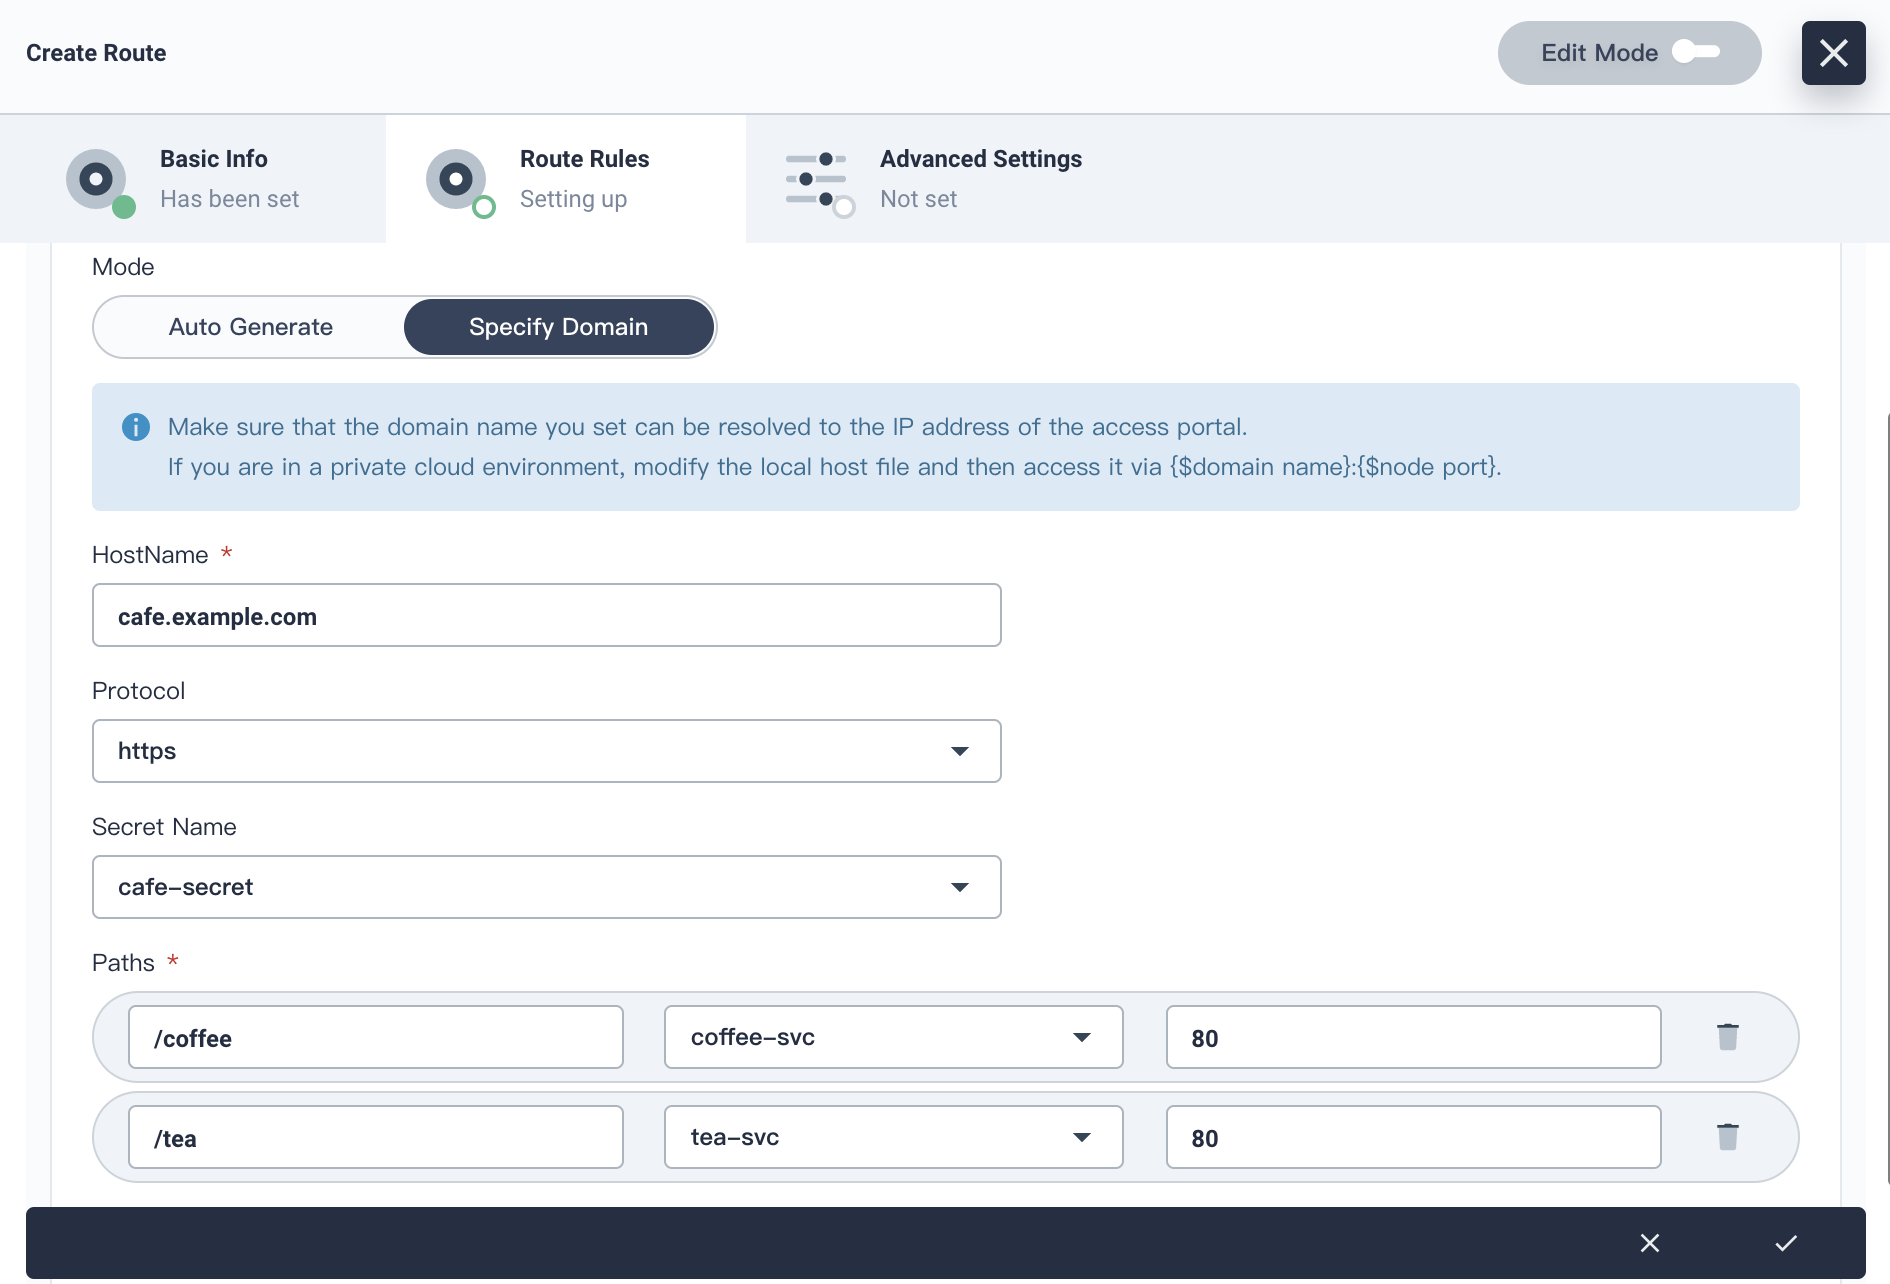
4.2. Name it cafe-ingress, click Next → Add Route Rule.
4.3. Choose Specify Domain and fill in the table as follows:
-
HostName:
cafe.example.com -
Protocol: Choose
https -
Secret Name: Choose
cafe-secret -
Paths:
- Input
/coffee, then choosecoffee-svcas the backend service and select80as the port - Click Add Path, input
/tea, then choosetea-svcas the backend service and select80as the port
- Input
4.4. Click √ and Next after you have done, then click Create. We can see the cafe-ingress has been created successfully.
Step 5: Access the Application Ingress
So far, we have exposed two different applications via route and its rules. We can access the tea and coffee applications through different paths.

For example, when we visit https://cafe.example.com:{$HTTPS_PORT}/coffee, the back-end Pod of coffee-svc should respond to the request. We can switch to admin account to log in KubeSphere and open web kubectl from Toolbox at the bottom right corner.
As shown in the following demo, the Server name and Server address is corresponding to the Pod coffee-svc-yfhqwu-7b7bbf49f4-6c55l. Please note the resolve information of the curl command is from the screenshot above. You should replace it with your real information.
$ curl --resolve cafe.example.com:30000:192.168.0.54 https://cafe.example.com:30000/coffee --insecure
Server address: 10.233.90.5:80
Server name: coffee-svc-yfhqwu-7b7bbf49f4-6c55l
Date: 05/Jan/2020:10:01:48 +0000
URI: /coffee
Request ID: 6fb79c32e0b99653d2f226eef374e798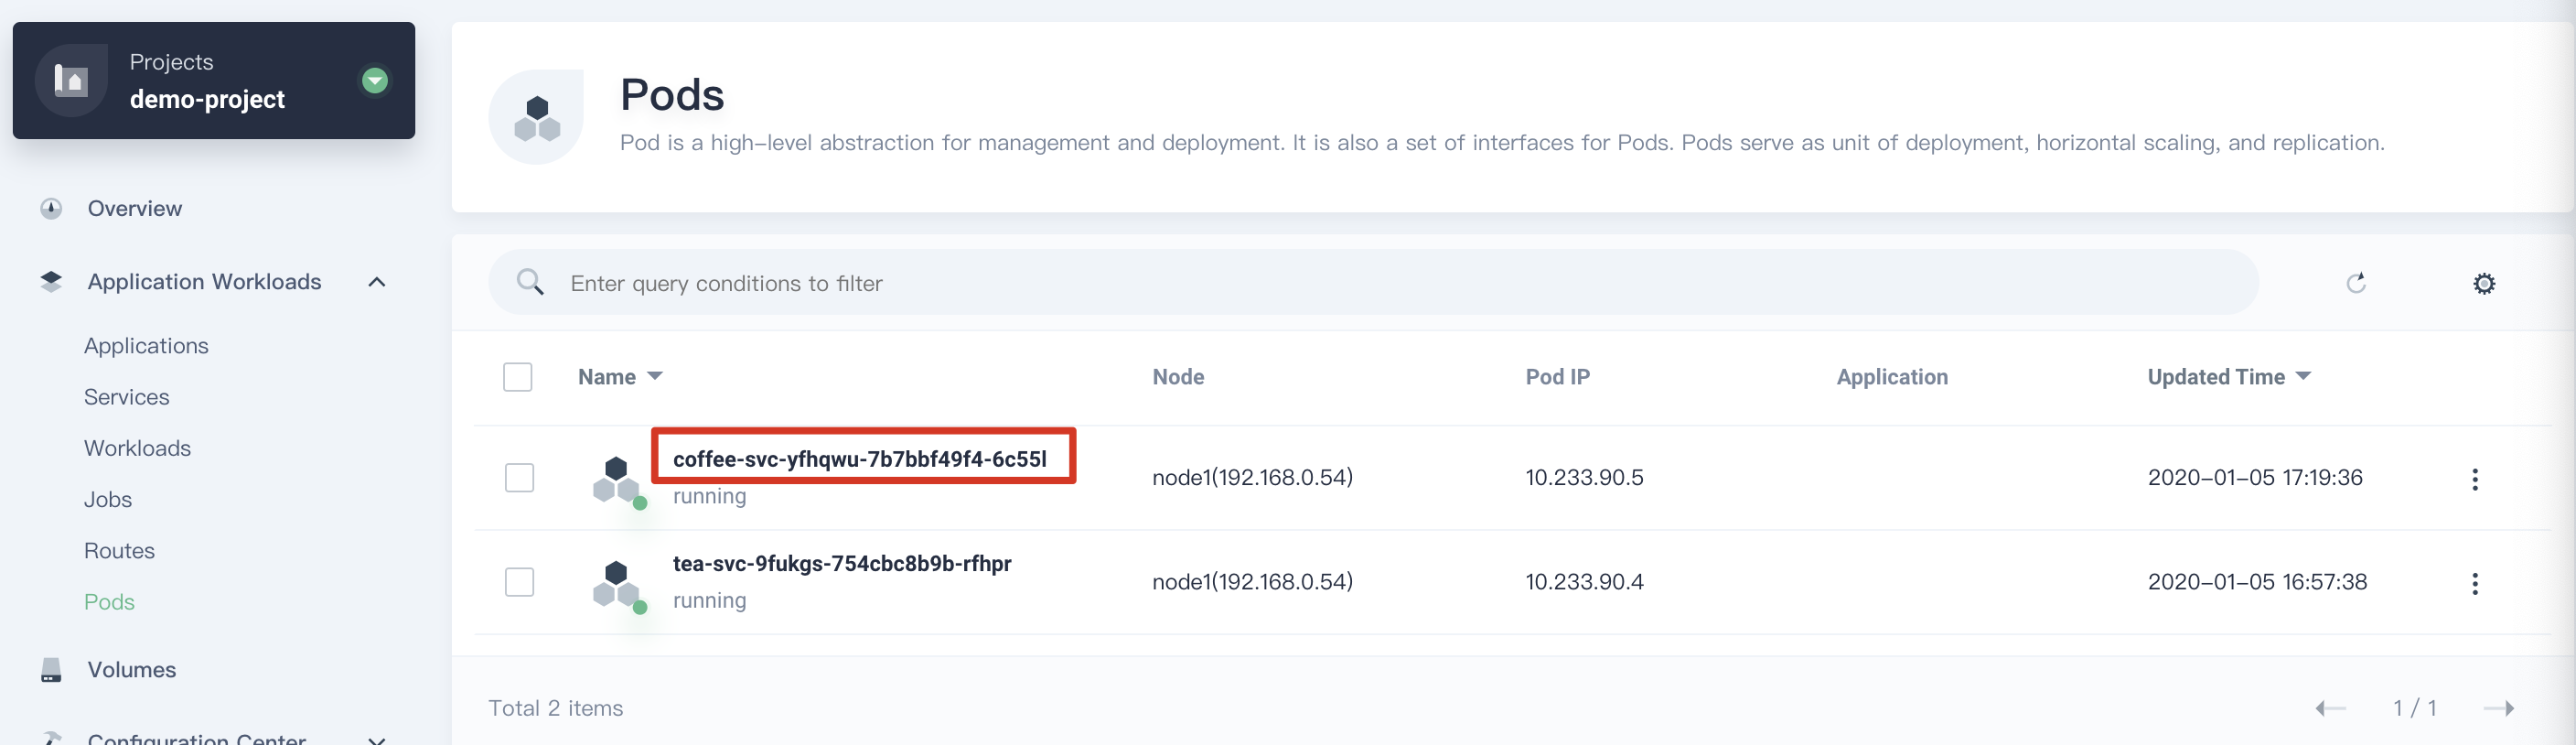
Similarly, when we visit https://cafe.example.com:{$HTTPS_PORT}/tea, the back-end Pod of tea-svc should respond to the request. As shown in the following demo, the Server name and Server address is corresponding to the Pod tea-svc-9fukgs-754cbc8b9b-rfhpr.
$ curl --resolve cafe.example.com:30000:192.168.0.54 https://cafe.example.com:30000/tea --insecure
Server address: 10.233.90.4:80
Server name: tea-svc-9fukgs-754cbc8b9b-rfhpr
Date: 05/Jan/2020:10:07:16 +0000
URI: /tea
Request ID: 2173c1565b368a5258368d15f55ca050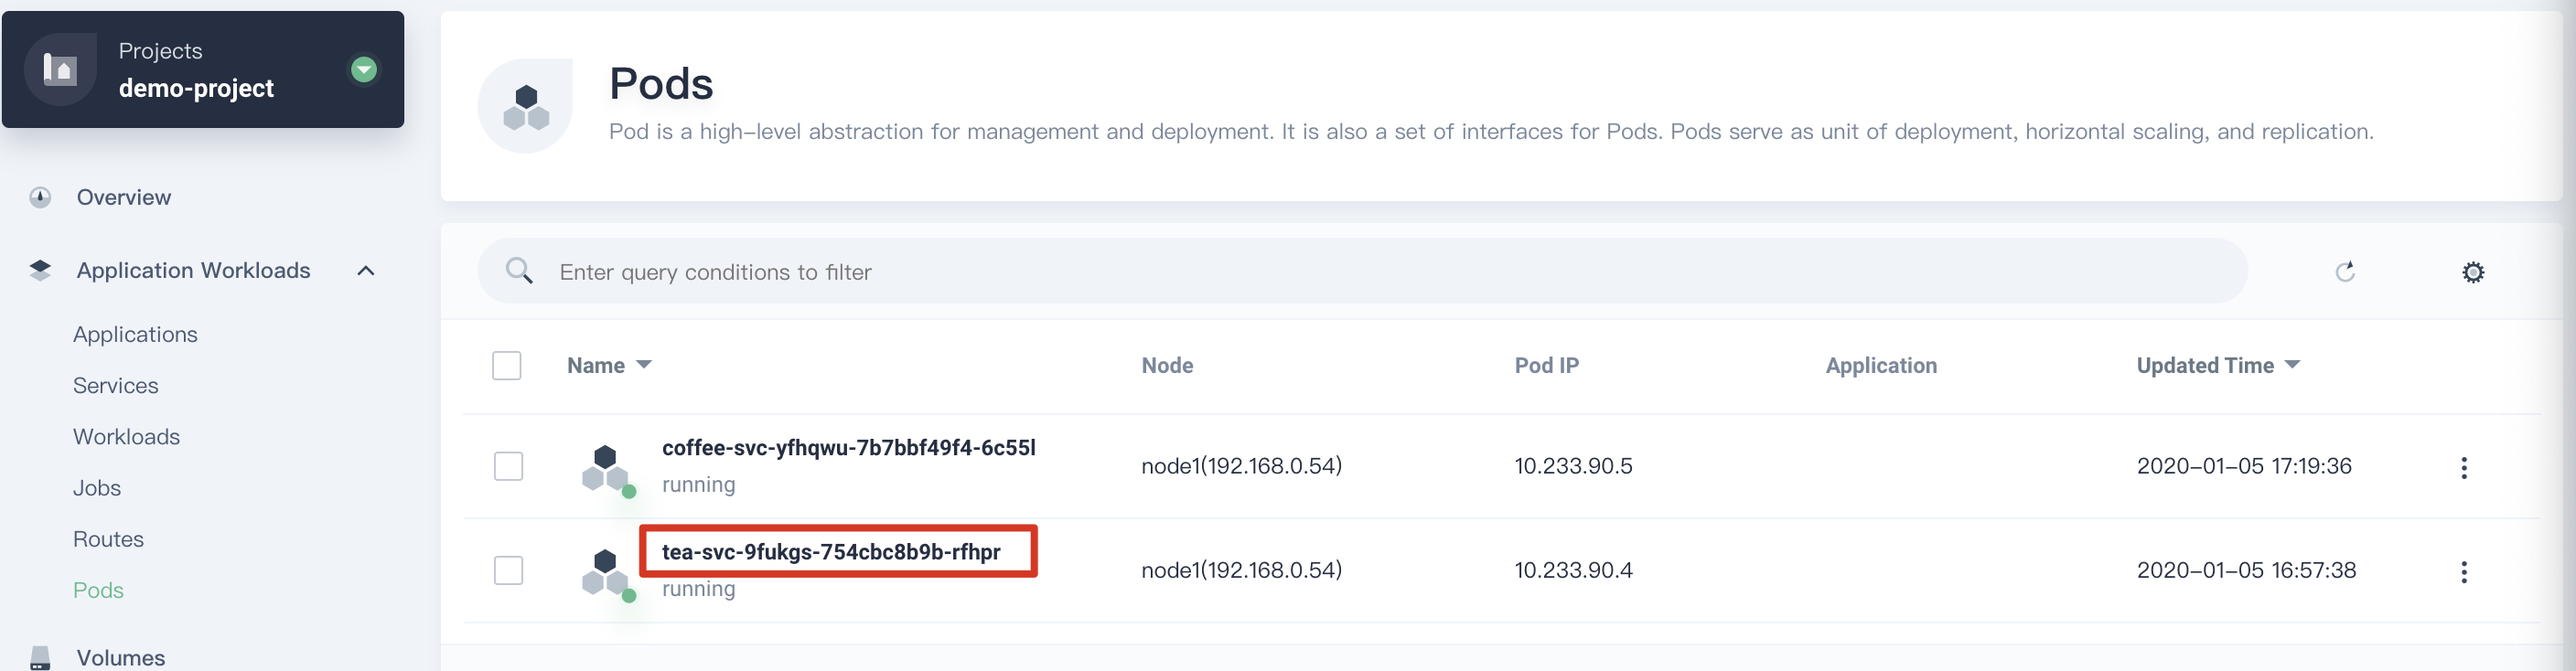
Conclusion
As we can see from the instructions above, it demonstrates that the route has successfully forwarded different requests to the corresponding back-end services, and the services redirect traffic to one of the corresponding service’s backend Pods.