Release Notes
Installation
Install on Linux
Install on Kubernetes
Pluggable Components
Upgrade
Third-Party Tools
Authentication Integration
Cluster Operations
Quick Start
DevOps
User Guide
Configration Center
Logging
Developer Guide
API Documentation
Troubleshooting
FAQ
Canary Release based on Ingress-Nginx
EditAs we demonstrated in Managing Canary Release of Microservice App based on Istio, you can use KubeSphere to implement grayscale release in your project based on Istio. However, many users are not using Istio. Most projects from these users are pretty simple so that we need to provide a light-weight solution for this case.
Ingress-Nginx brings a new feature with "Canary", which could be used as a load balancer for gateway. The canary annotation enables the Ingress spec to act as an alternative service for requests to route to depending on the applied rules, and control the traffic splits. KubeSphere built-in gateway of each project supports the "Canary" feature of Ingress-Nginx.
We have elaborated on the scenarios of grayscale in the Istio bookinfo guide. In this document we are going to demonstrate how to use KubeSphere route and gateway, namely, Ingress and Ingress-Controller, to implement grayscale release.
Note: The demo YAML files has been uploaded to GitHub.
Ingress-Nginx Annotation
Based on Nginx Ingress Controller, KubeSphere implements the gateway in each project, namely, Kubernetes namespace, serving as the traffic entry and a reverse proxy of each project. Nginx annotations support the following rules after nginx.ingress.kubernetes.io/canary: "true" is set. Please refer to Nginx Annotations for further explanation.
nginx.ingress.kubernetes.io/canary-by-headernginx.ingress.kubernetes.io/canary-by-header-valuenginx.ingress.kubernetes.io/canary-weightnginx.ingress.kubernetes.io/canary-by-cookie
Note: Canary rules are evaluated in order of precedence. Precedence is as follows:
canary-by-header - > canary-by-cookie - > canary-weight.
The four annotation rules above can be generally divided into the following two categories:
- The canary rules based on the weight
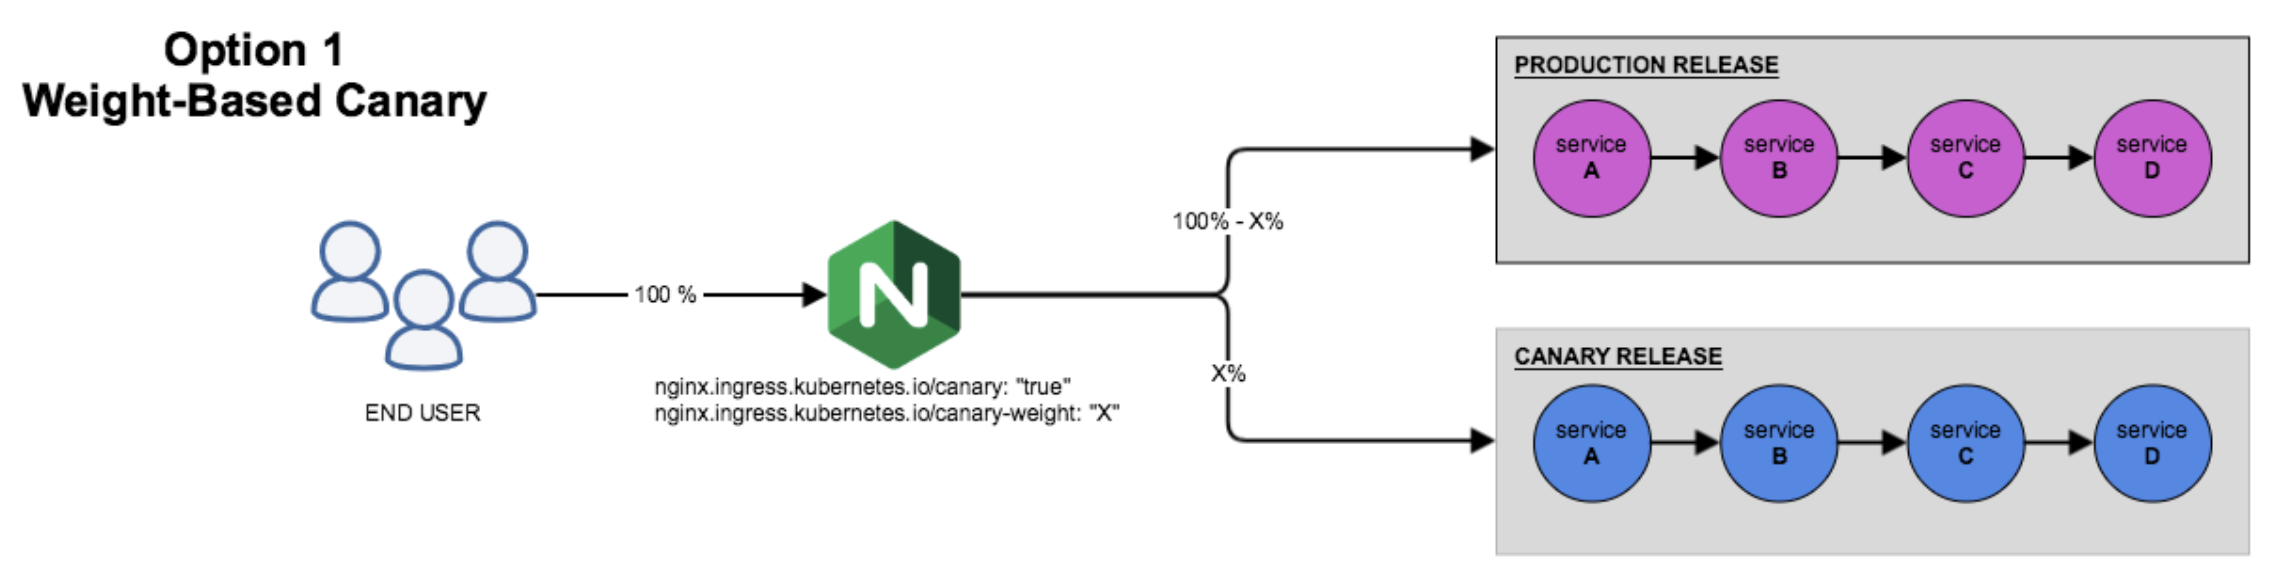
- The canary rules based on the user request

Prerequisites
- You need to complete all steps in Getting Started with Multi-tenant Management.
Hands-on Lab
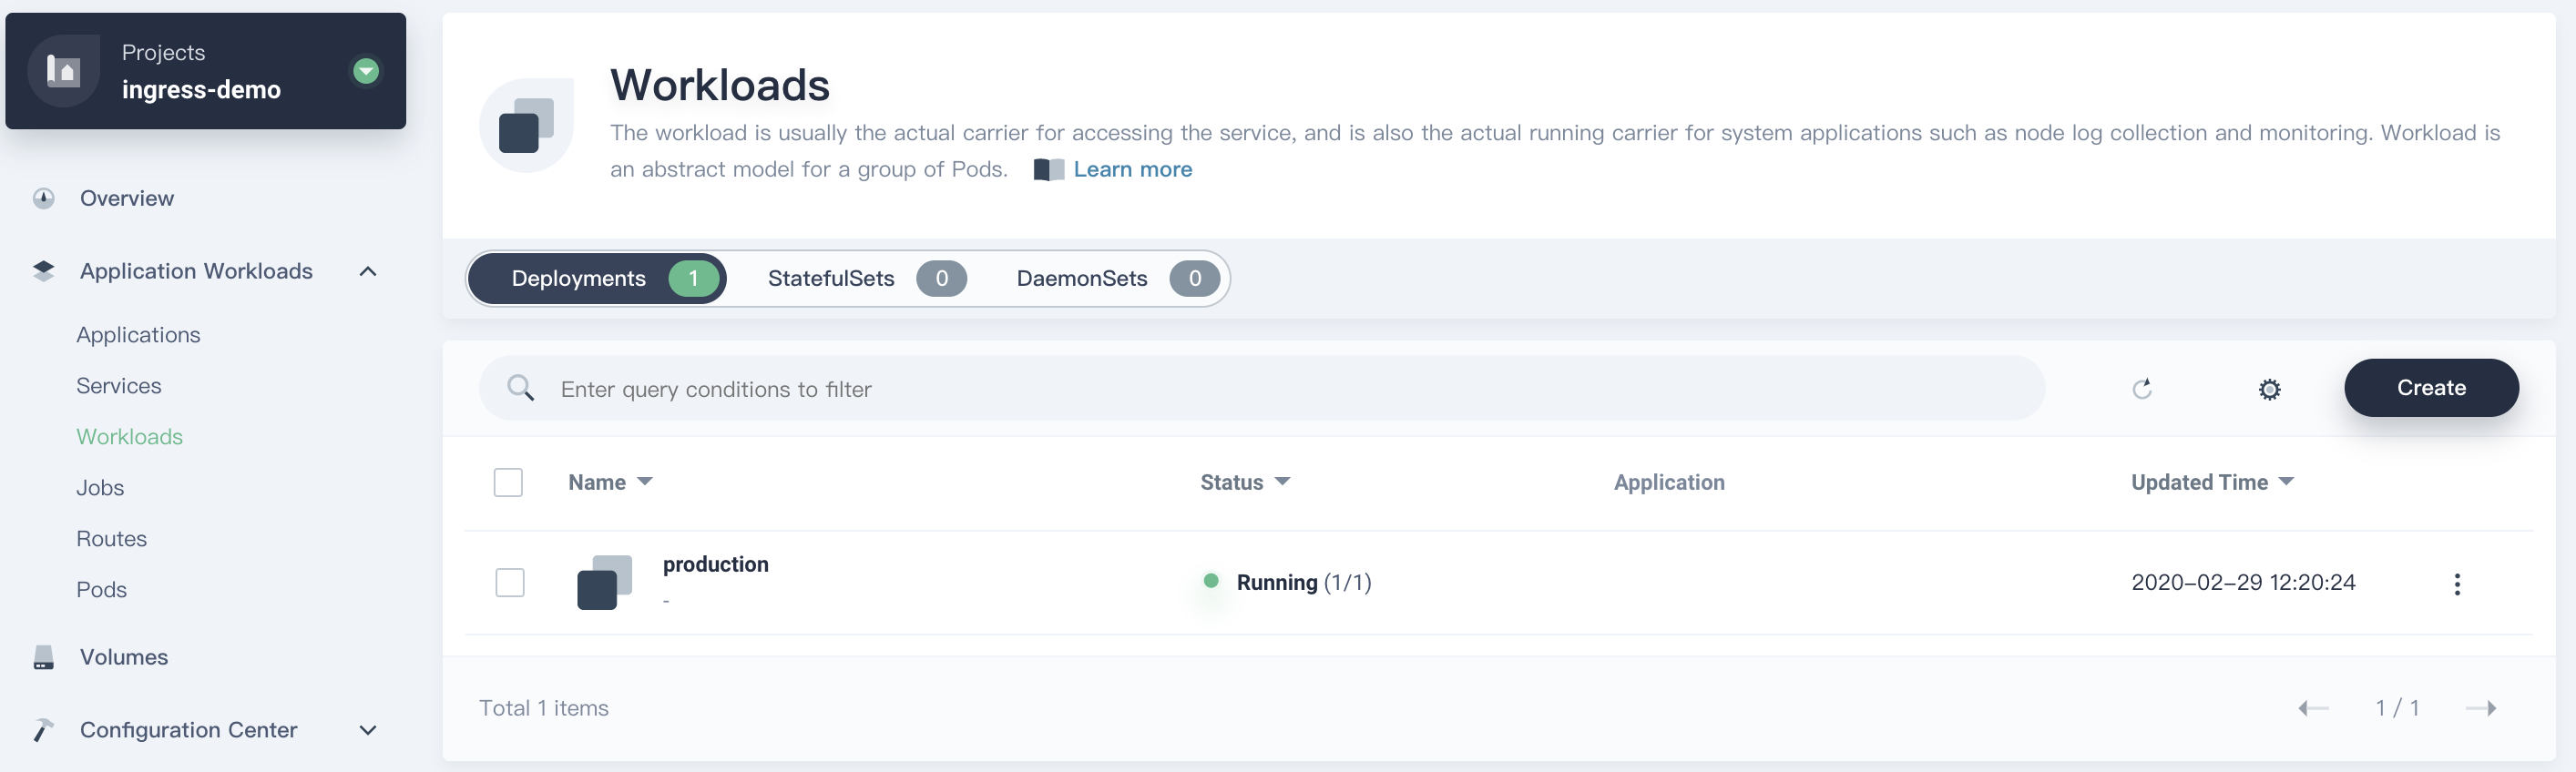
Step 1: Create Project and Application
1.1. Use project-admin account to log in KubeSphere, create a project ingress-demo under the workspace demo-workspace. Go to Project Settings → Advanced Settings, click Set Gateway, and click Save to open the gateway in this project. Note it defaults to NodePort.

1.2. We are going to use command line to create the resources provided by the following yaml files. Log in KubeSphere with admin account, open Web kubectl from the Toolbox at the bottom-right corner of console, then use the following command to create production resources Deployment and Service:
$ kubectl apply -f production.yaml -n ingress-demo
deployment.extensions/production created
service/production created
The file is as follows:
production.yaml
apiVersion: apps/v1
kind: Deployment
metadata:
name: production
labels:
app: production
spec:
replicas: 1
selector:
matchLabels:
app: production
template:
metadata:
labels:
app: production
spec:
containers:
- name: production
image: mirrorgooglecontainers/echoserver:1.10
ports:
- containerPort: 8080
env:
- name: NODE_NAME
valueFrom:
fieldRef:
fieldPath: spec.nodeName
- name: POD_NAME
valueFrom:
fieldRef:
fieldPath: metadata.name
- name: POD_NAMESPACE
valueFrom:
fieldRef:
fieldPath: metadata.namespace
- name: POD_IP
valueFrom:
fieldRef:
fieldPath: status.podIP
---
apiVersion: v1
kind: Service
metadata:
name: production
labels:
app: production
spec:
ports:
- port: 80
targetPort: 8080
protocol: TCP
name: http
selector:
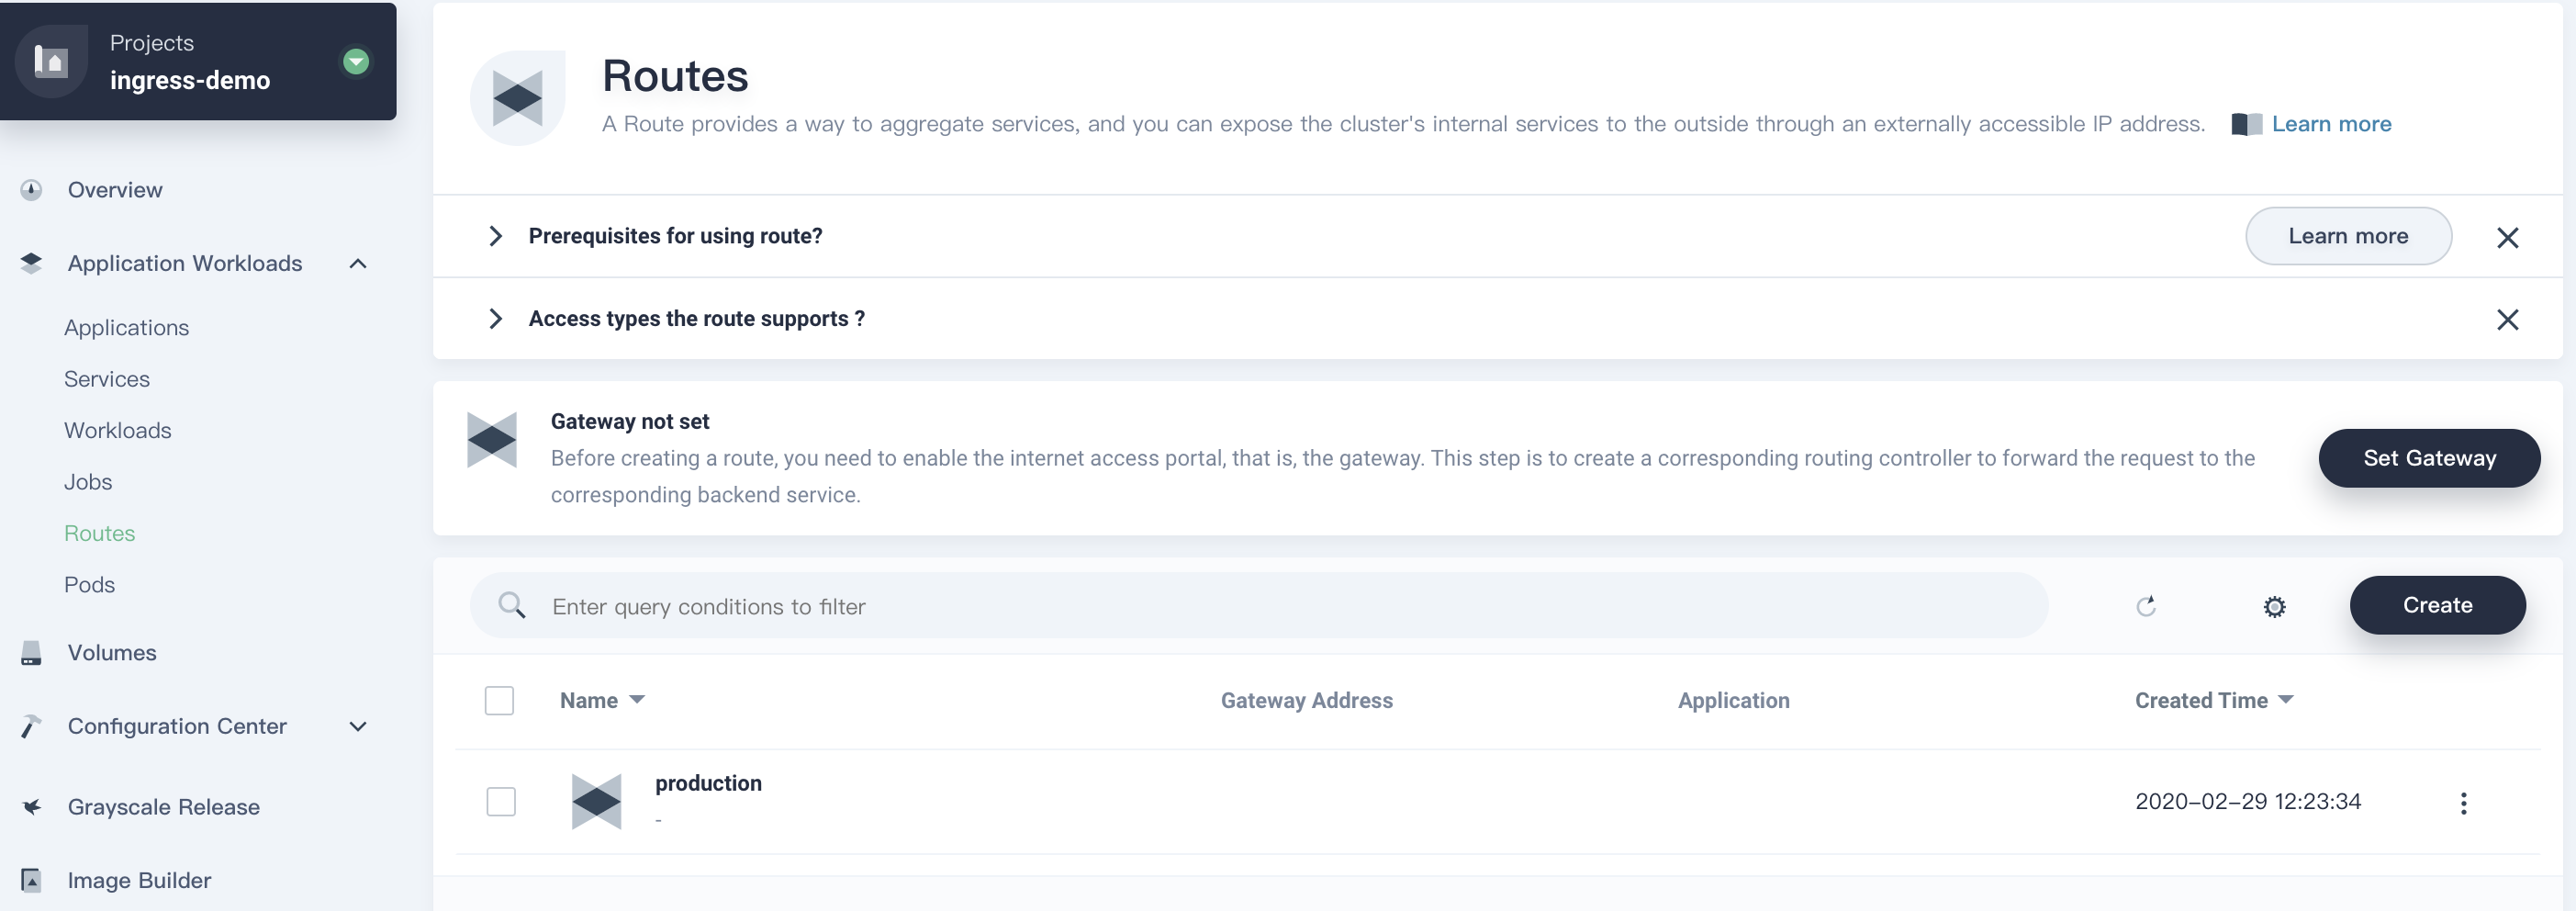
app: production1.3. Now create a production Ingress.
$ kubectl apply -f production.ingress -n ingress-demo
ingress.extensions/production created
The file is as follows:
production.ingress
apiVersion: extensions/v1beta1
kind: Ingress
metadata:
  name: production
  annotations:
    kubernetes.io/ingress.class: nginx
spec:
  rules:
  - host: kubesphere.io
    http:
      paths:
      - backend:
          serviceName: production
          servicePort: 80
Step 2: Access the Production Application
You can verify each resource by navigating to the corresponding lists from the console.
Deployment
Service

Route (Ingress)
Use the command to access the application of production.
Note:
192.168.0.88is the gateway address of each project and30205is the NodePort. You need yo replace with the actual values from the Route details page.
$ curl --resolve kubesphere.io:30205:192.168.0.88 kubesphere.io:30205

Hostname: production-6b4bb8d58d-7r889

Pod Information:
  node name:	ks-allinone
	pod name:	production-6b4bb8d58d-7r889
	pod namespace:	ingress-demo
	pod IP:	10.233.87.165

Server values:
	server_version=nginx: 1.12.2 - lua: 10010

Request Information:
	client_address=10.233.87.225
	method=GET
	real path=/
	query=
	request_version=1.1
	request_scheme=http
	request_uri=http://kubesphere.io:8080/

Request Headers:
	accept=*/*
	host=kubesphere.io:30205
	user-agent=curl/7.29.0
apiVersion: extensions/v1beta1
	x-forwarded-for=192.168.0.88
	x-forwarded-host=kubesphere.io:30205
	x-forwarded-port=80
	x-forwarded-proto=http
	x-original-uri=/
	x-real-ip=192.168.0.88
	x-request-id=9596df96e994ea05bece2ebbe689a2cc
	x-scheme=http

Request Body:
	-no body in request-
Step 3: Create Canary Version of the Application
Same as above, refer to the yaml files that we used in production to create an application of canary version, including Deployment and Service, you just need to replace the occurrences of production with canary in those yaml files.
Step 4: Ingress-Nginx Annotation Rules
Set Canary Release based on Weight
A typical scenario of the rule is based on weight, that is, blue-green deployment. You can set the weight from 0 to 100 to implement that kind of application release. At any time, only one of the environments is production. For this example, currently green is production and blue is canary. Initially, the weight of canary is set to 0 which means no traffic is forwarded to this release. You can introduce a small portion of traffic to blue version step by step, test and verify it. If everything is OK then you can shift all requests from green to blue by set the weight of blue to 100 which makes blue the production release. In a word, with such canary releasing process, the application is upgraded smoothly.
4.1. Now create a canary Ingress. The following file uses canary-weight annotation to introduce 30% of all traffic to the canary version.
$ kubectl apply -f weighted-canary.ingress -n ingress-demo
ingress.extensions/canary created
The yaml file is as follows.
apiVersion: extensions/v1beta1
kind: Ingress
metadata:
  name: canary
  annotations:
    kubernetes.io/ingress.class: nginx
    nginx.ingress.kubernetes.io/canary: "true"
    nginx.ingress.kubernetes.io/canary-weight: "30"
spec:
  rules:
  - host: kubesphere.io
    http:
      paths:
      - backend:
          serviceName: canary
          servicePort: 80
4.2. Verify the Weighted Canary Release
Note: Although we set
30%of traffic to the canary, the traffic ratio may fluctuate to a small extent.
for i in $(seq 1 10); do curl -s --resolve kubesphere.io:30205:192.168.0.88 kubesphere.io:30205 | grep "Hostname"; done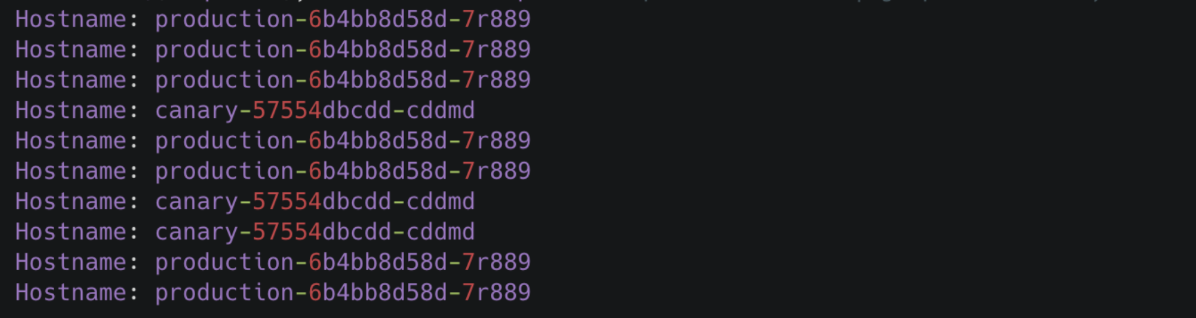
Set Canary Release based on Request Header
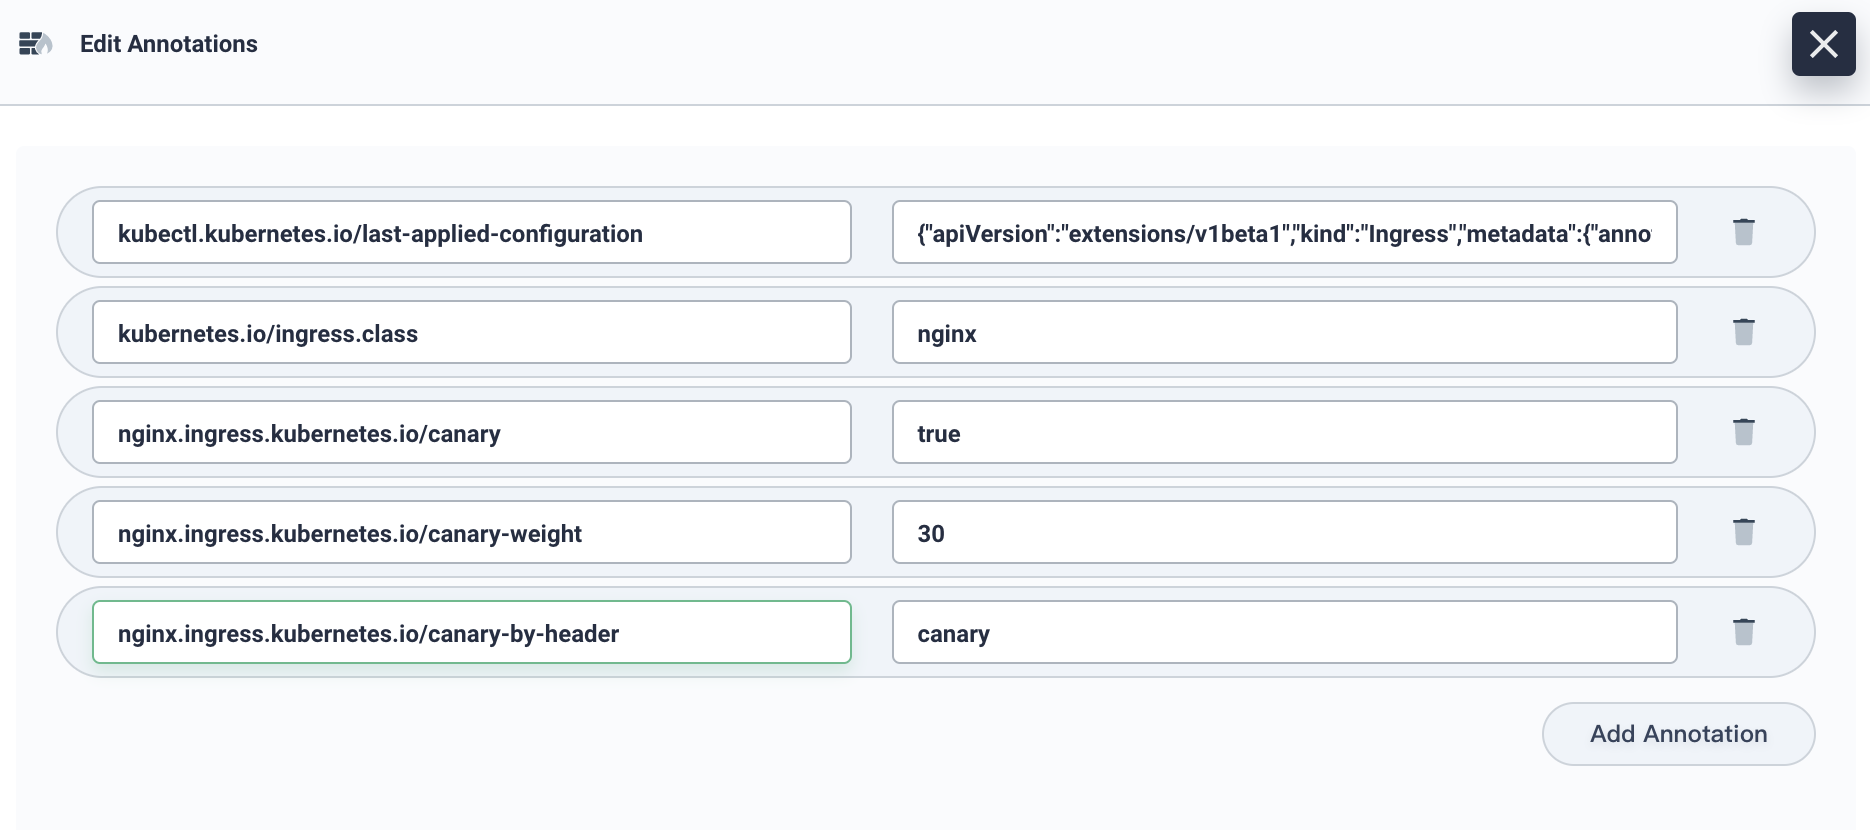
4.3. Go to Application Workloads → Routes, click into the detailed page of route canary, then go to More → Edit Annotations. Follow the screenshot below, add a row of annotation with nginx.ingress.kubernetes.io/canary-by-header: canary to the Ingress of canary release created above. The header to use for notifying the Ingress to route the request to the service specified in the canary Ingress.
Note: Canary rules are evaluated in order of precedence. Precedence is as follows:
canary-by-header - > canary-by-cookie - > canary-weight. Thus the the old annotationcanary-weightwill be ignored.
4.4. Add different header in the request, and access the application domain name. More specifically,
- When the request header is set to
always, it will be routed to the canary. - When the header is set to
never, it will never be routed to the canary.
Note: For any other value, the header will be ignored and the request compared against the other canary rules by precedence.
for i in $(seq 1 10); do curl -s -H "canary: never" --resolve kubesphere.io:30205:192.168.0.88 kubesphere.io:30205 | grep "Hostname"; done
We set the canary: other-value in the header, the Ingress with canary value 30% to take precedence over others.
for i in $(seq 1 10); do curl -s -H "canary: other-value" --resolve kubesphere.io:30205:192.168.0.88 kubesphere.io:30205 | grep "Hostname"; done
4.5. Now we can add a new row of annotation nginx.ingress.kubernetes.io/canary-by-header-value: user-value which is for notifying the Ingress to route the request to the service specified in the canary Ingress.
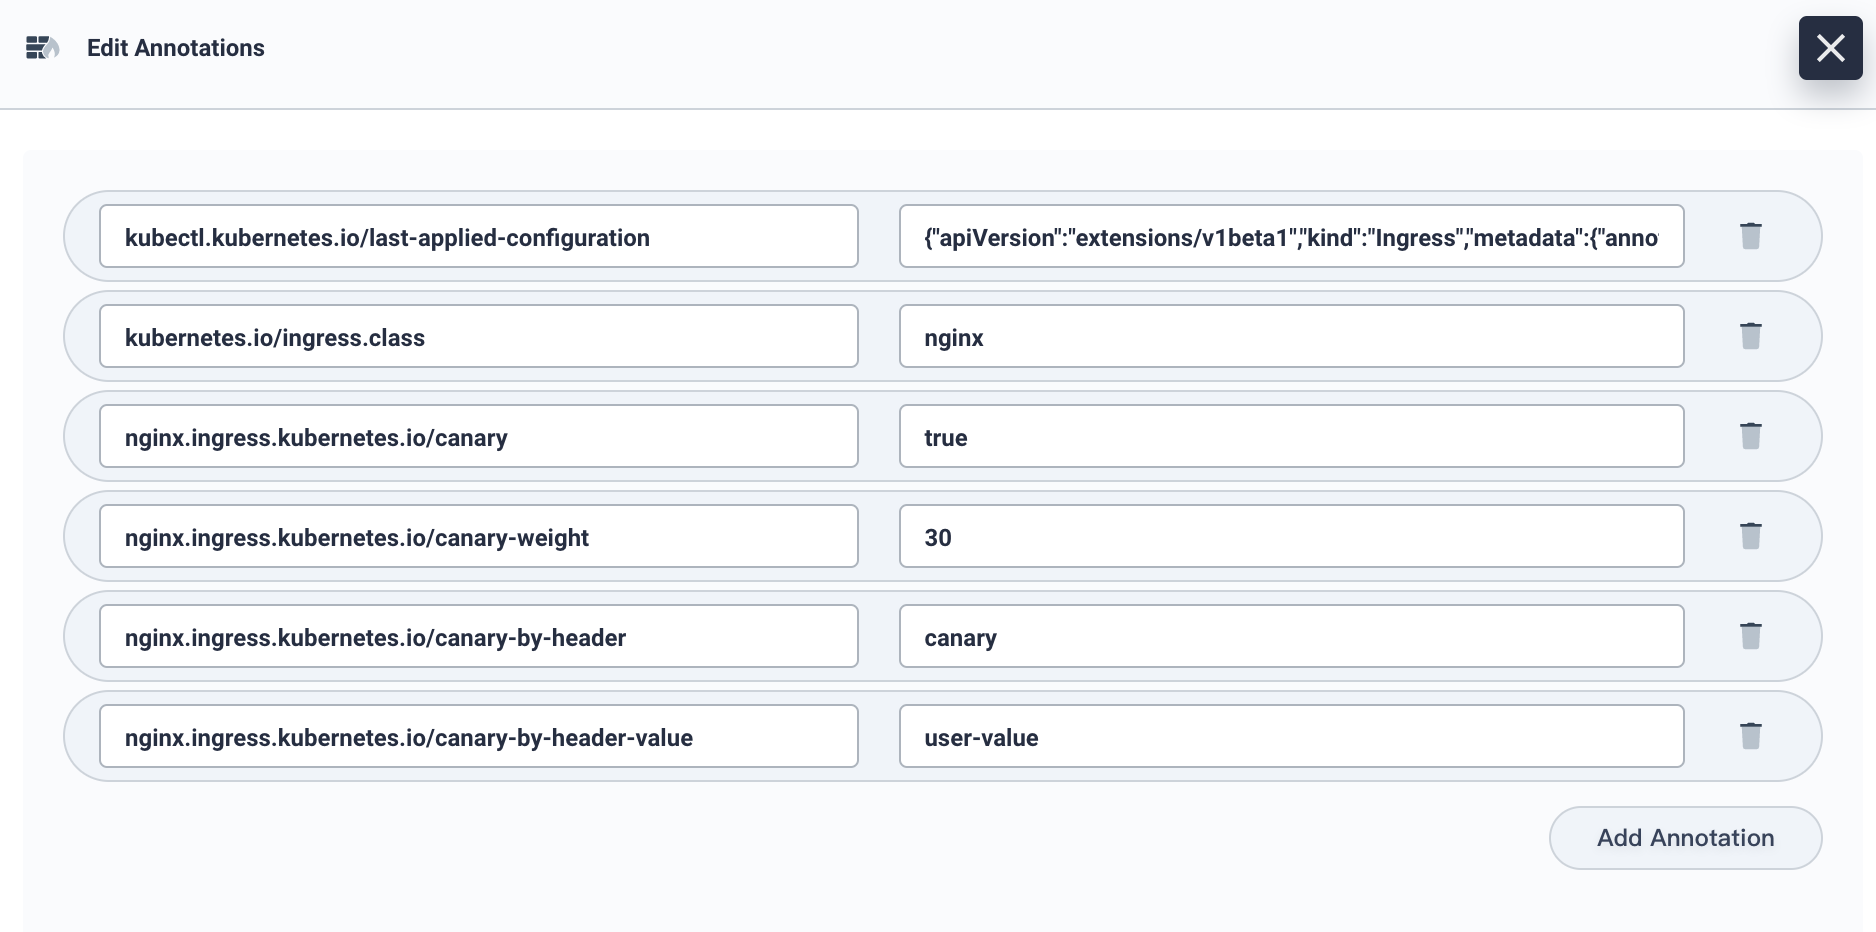
4.6. Access the domain name as follows, when the request header is set to this value, it will be routed to the canary version. For any other header value, the header will be ignored and the request is compared against the other canary rules by precedence.
Note: It allows users to customize the value of Request Header.
for i in $(seq 1 10); do curl -s -H "canary: user-value" --resolve kubesphere.io:30205:192.168.0.88 kubesphere.io:30205 | grep "Hostname"; done
Based on Cookie
4.7. Similar to Request Header, the cookie to use for notifying the Ingress to route the request to the service specified in the canary Ingress. When the cookie value is set to always, it will be routed to the canary version, otherwise, it will never be routed to the canary version. For any other value, the cookie will be ignored and the request is compared against the other canary rules by precedence. For example, if we only allow the users from London to access the canary version, we can set the annotation with nginx.ingress.kubernetes.io/canary-by-cookie: "users_from_London". At this point, the system will check the user request, if the requests are from London, then set the value of cookie users_from_London to always, in order to ensure only the users from London access the canary version.
Conclusion
Grayscale release can ensure overall system stability. You can find problems and make adjustments at the initial gray scale to minimize the degree of impact. We have demonstrated four annotation rules of Ingress-Nginx. It is convenient and light-weight for users who want to implement grayscale release without Istio.