v2.1
v2.0
v1.0
  1. Release Notes
    1. Release Notes - 2.1.1Latest
    1. Release Notes - 2.1.0
    1. Release Notes - 2.0.2
    1. Release Notes - 2.0.1
    1. Release Notes - 2.0.0
  1. Introduction
    1. Introduction
    1. Features
    1. Architecture
    1. Advantages
    1. Glossary
  1. Installation
    1. Introduction
      1. Intro
      2. Port Requirements
      3. Kubernetes Cluster Configuration
    1. Install on Linux
      1. All-in-One Installation
      2. Multi-Node Installation
      3. High Availability Configuration
      4. Air Gapped Installation
      5. StorageClass Configuration
      6. Enable All Components
    1. Install on Kubernetes
      1. Prerequisites
      2. Install on K8s
      3. Air Gapped Installation
      4. Install on GKE
    1. Pluggable Components
      1. Pluggable Components
      2. Enable Application Store
      3. Enable DevOps System
      4. Enable Logging System
      5. Enable Service Mesh
      6. Enable Alerting and Notification
      7. Enable Metrics-server for HPA
      8. Verify Components Installation
    1. Upgrade
      1. Overview
      2. All-in-One
      3. Multi-node
    1. Third-Party Tools
      1. Configure Harbor
      2. Access Built-in SonarQube and Jenkins
      3. Enable built-in Grafana Installation
      4. Load Balancer plugin in Bare Metal - Porter
    1. Authentication Integration
      1. Configure LDAP/AD
    1. Cluster Operations
      1. Add or Cordon Nodes
      2. High Risk Operations
      3. Uninstall KubeSphere
  1. Quick Start
    1. 1. Getting Started with Multi-tenancy
    1. 2. Expose your App Using Ingress
    1. 3. Compose and Deploy Wordpress to K8s
    1. 4. Deploy Grafana Using App Template
    1. 5. Job to Compute π to 2000 Places
    1. 6. Create Horizontal Pod Autoscaler
    1. 7. S2I: Publish your App without Dockerfile
    1. 8. B2I: Publish Artifacts to Kubernete
    1. 9. CI/CD based on Spring Boot Project
    1. 10. Jenkinsfile-free Pipeline with Graphical Editing Panel
    1. 11. Canary Release of Bookinfo App
    1. 12. Canary Release based on Ingress-Nginx
    1. 13. Application Store
  1. DevOps
    1. Pipeline
    1. Create SonarQube Token
    1. Credentials
    1. Set CI Node for Dependency Cache
    1. Set Email Server for KubeSphere Pipeline
  1. User Guide
    1. Configration Center
      1. Secrets
      2. ConfigMap
      3. Configure Image Registry
  1. Logging
    1. Log Query
  1. Developer Guide
    1. Introduction to S2I
    1. Custom S2I Template
  1. API Documentation
    1. API Documentation
    1. How to Access KubeSphere API
  1. Troubleshooting
    1. Troubleshooting Guide for Installation
  1. FAQ
    1. Telemetry
KubeSphere®️ 2020 All Rights Reserved.

Enable Service Mesh

Edit

What is KubeSphere Service Mesh

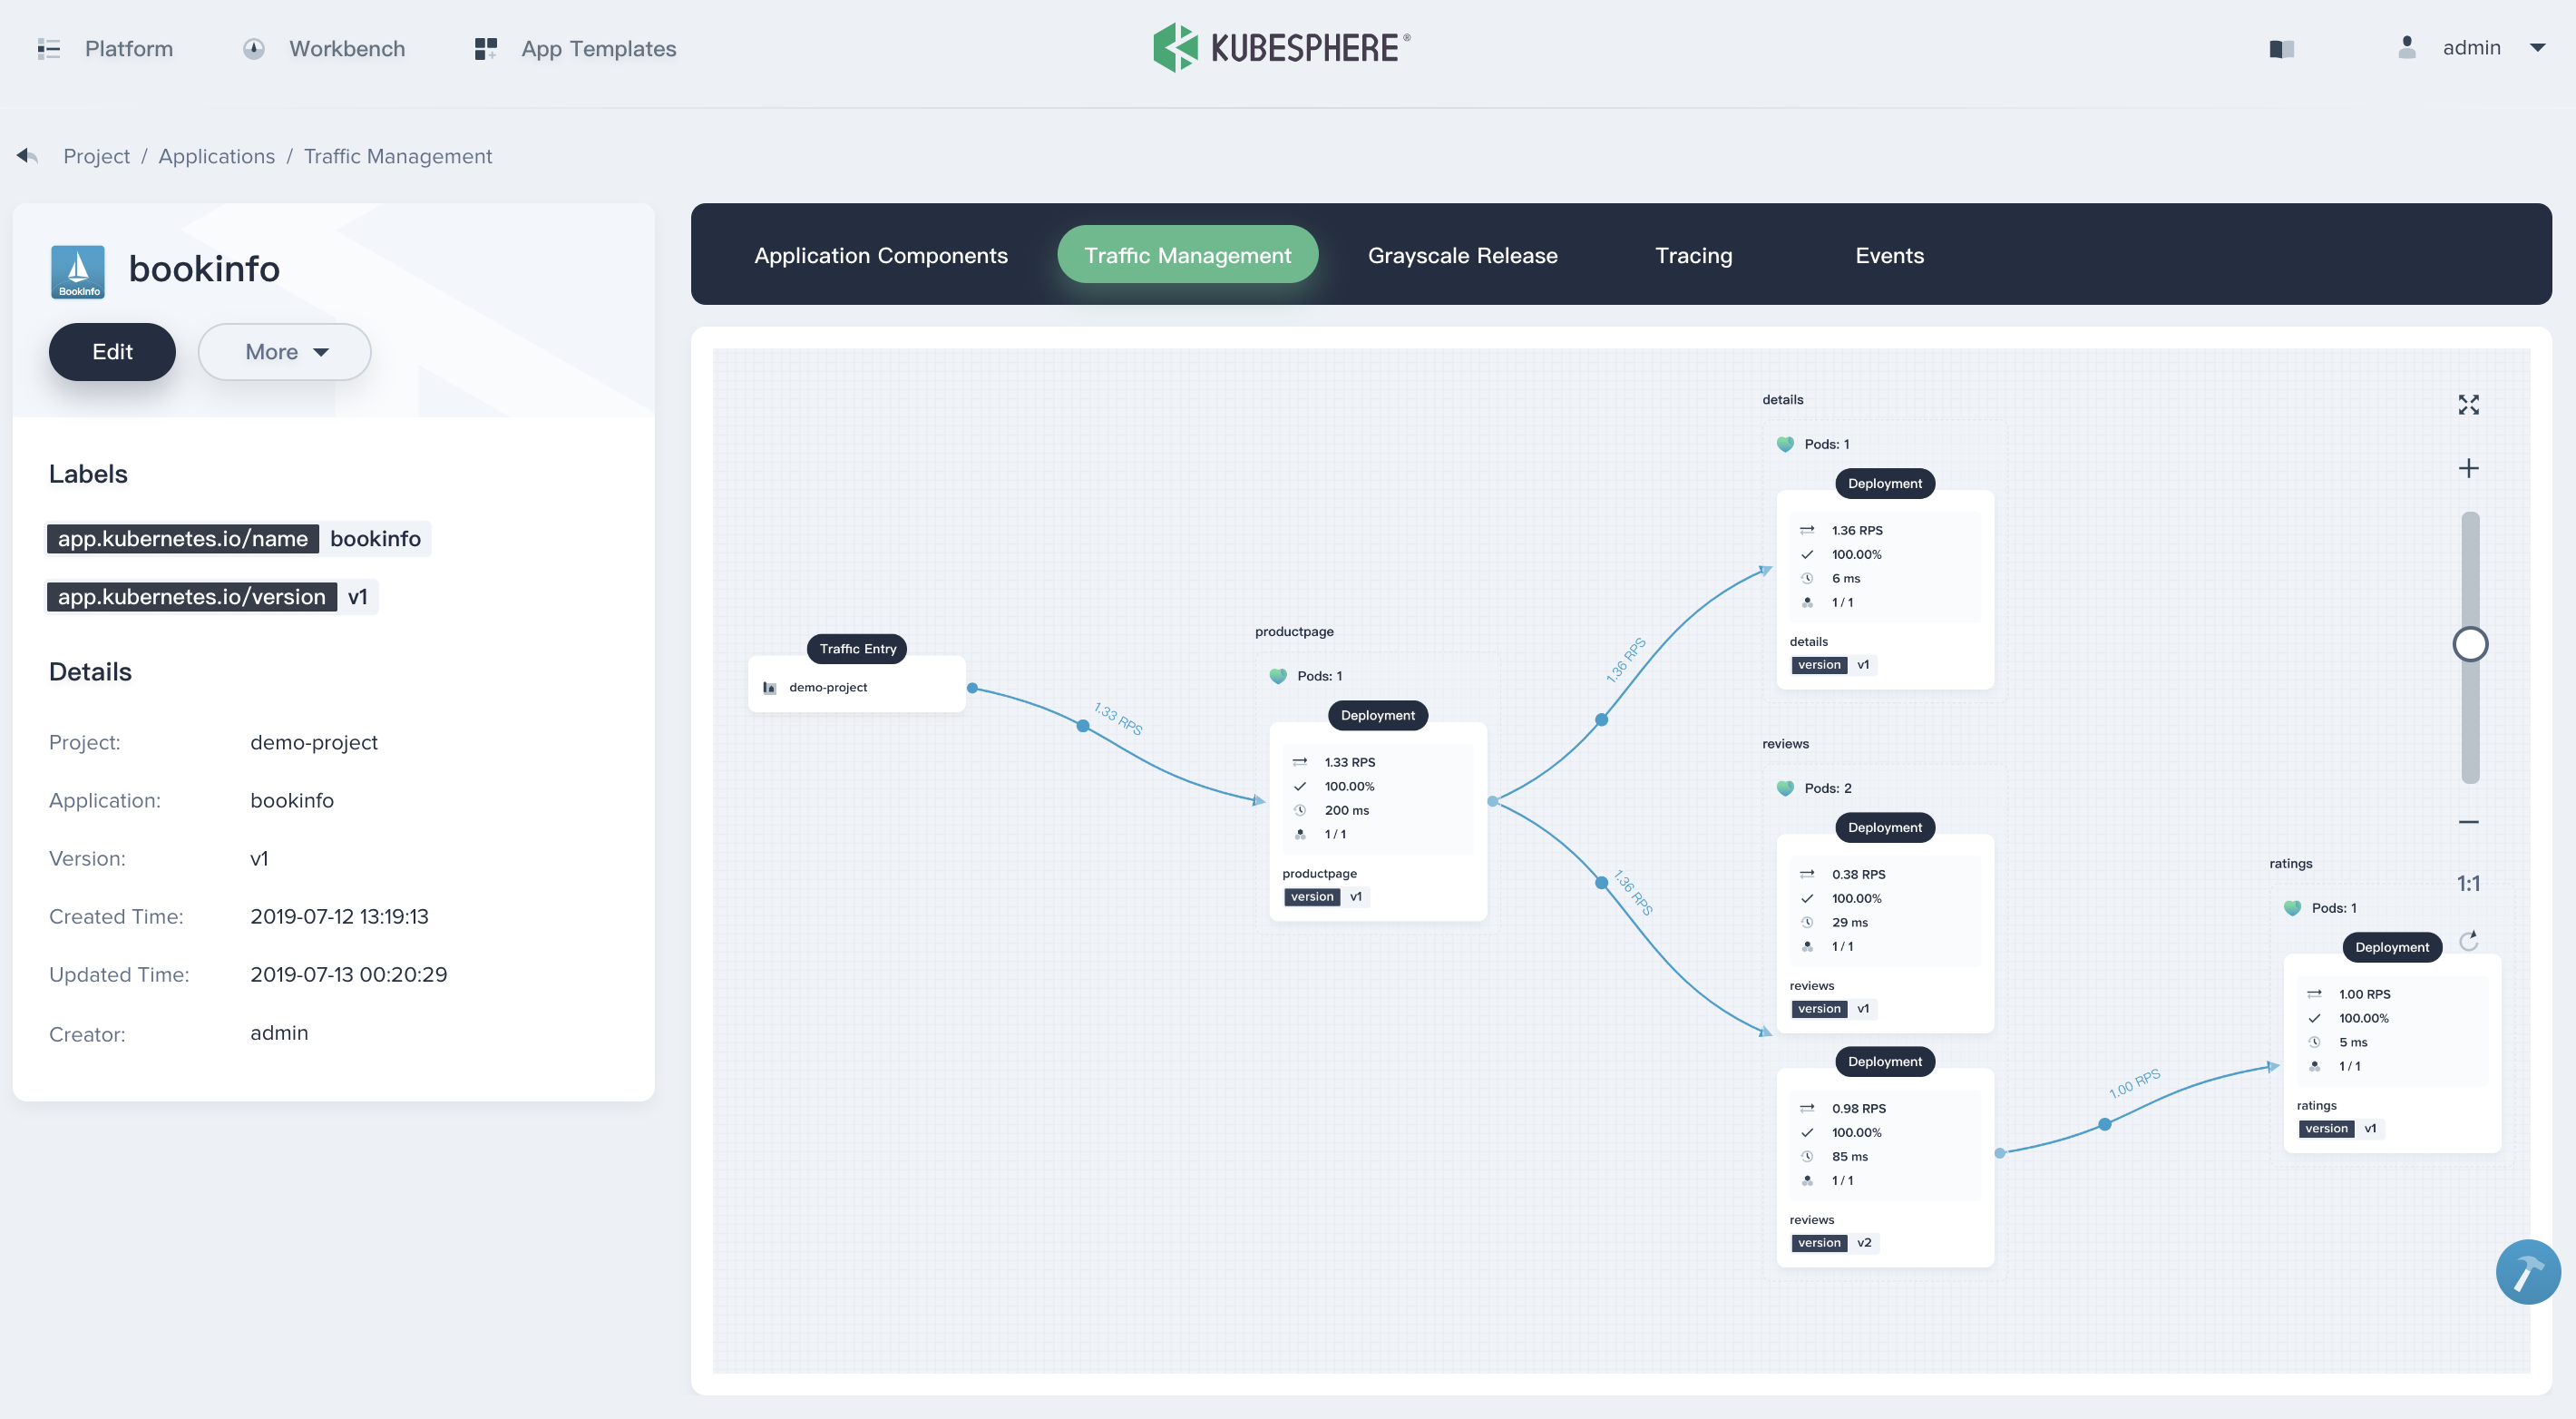
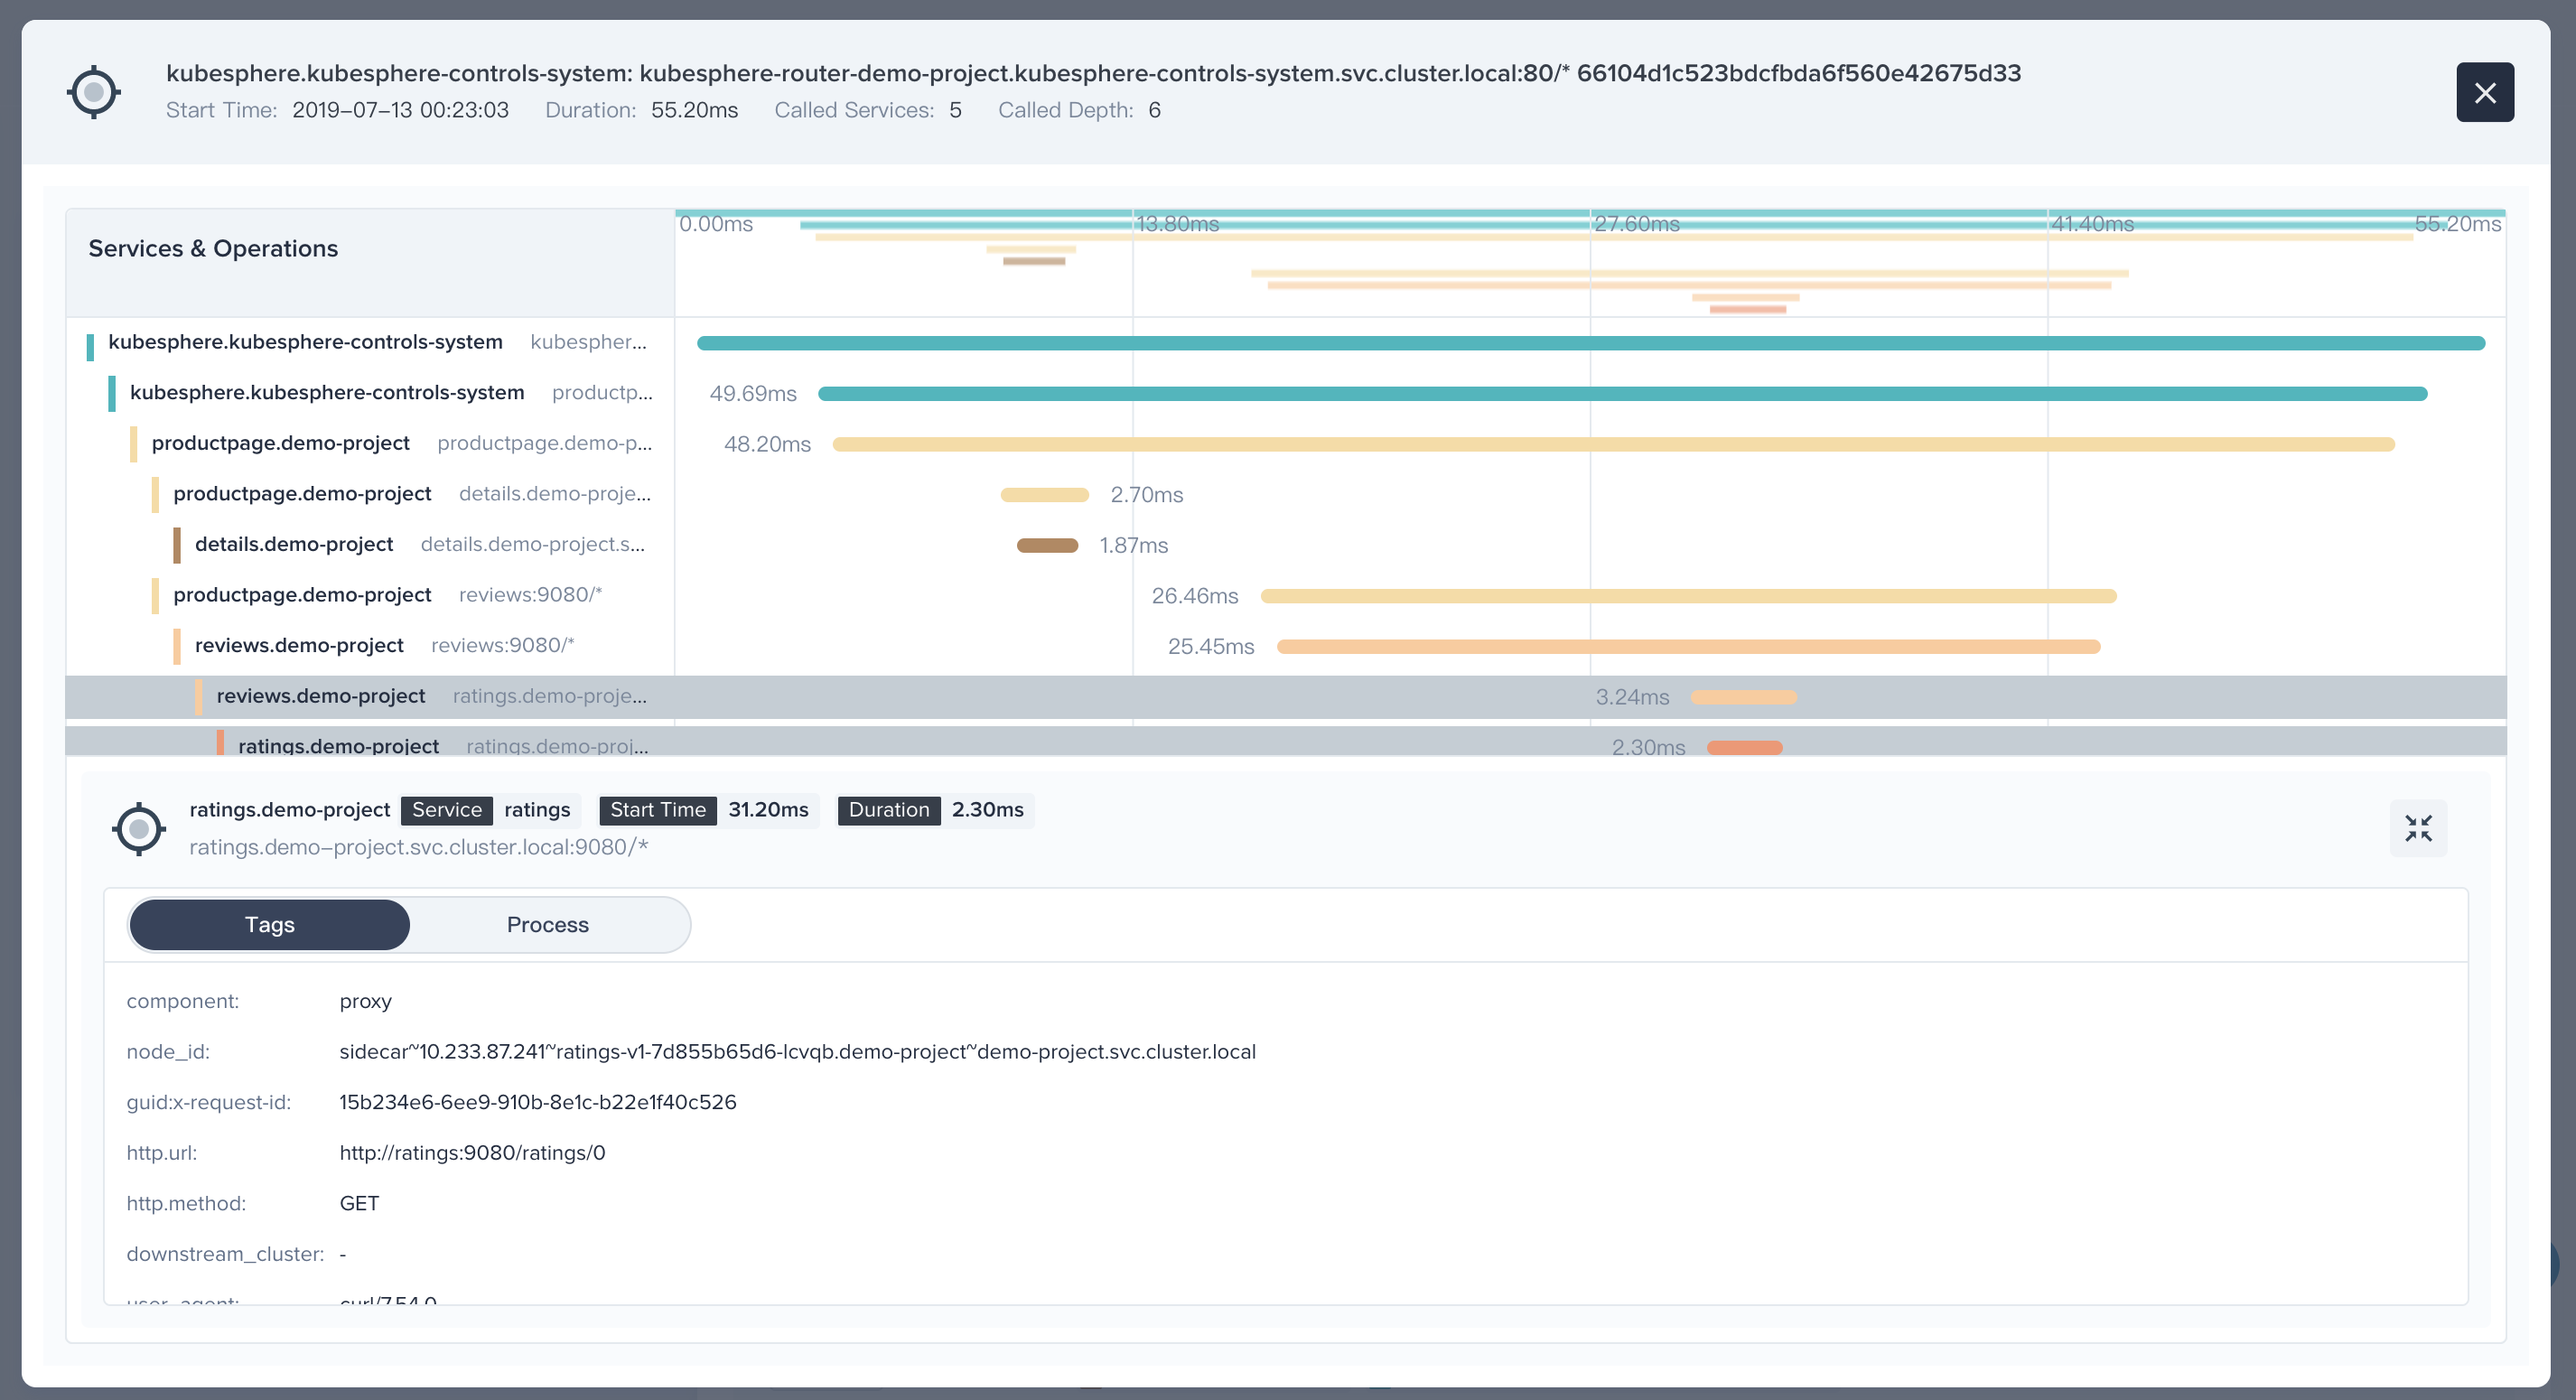
KubeSphere service mesh, based on Istio, visualizes the microservice governance and traffic management, provides circuit break, blue-green Deployment, canary release, traffic mirror, tracing, observability and traffic control. It enables developers get started with service mesh without modifying source code, reduce the learning curve of Istio. All features of KubeSphere service mesh are designed from business perspective.

Traffic Management

Tracing

Enable Service Mesh before Installation

KubeSphere service mesh system requires at least 2 Core of CPU request and 3.6G of memory request. Please make sure your cluster has enough resource.

Note:

  • Currently, the tracing (Jaeger) in the KubeSphere service mesh depends on the KubeSphere logging system. Before installing service mesh, please install the KubeSphere logging system first.

Before execute installation, you can set servicemesh_enabled to true to allow Istio and Jaeger installation according to the following configuration, then you can back to All-in-One or Multi-Node to continue installation.

# Following components are all optional for KubeSphere,
# Which could be turned on to install it before installation or later by updating its value to true
···
servicemesh_enabled: true

Enable Application Store after Installation

If you already have set up KubeSphere without enabling service mesh, you still can edit the ConfigMap of ks-installer using the following command.

kubectl edit cm -n kubesphere-system ks-installer

Then set servicemesh from False to True.

servicemesh:
    enabled: True

Save it and exit, it will be installed automatically. You can inspect the logs of ks-installer Pod to verify the installation status, and wait for the successful result logs output.